Menu Navigation
Lists ... Customers ... Customer List
Activities ... Customers ... New Customer Entry
About Customers
Customers are the focal point of any business. ManageMore gives you the ability to enter and track all the information you need about your customers. All relevant customer data, including such personal information as Social Security Number, and Driver's License Number, has a place on the customer record. This data can then be easily retrieved through reports to give you in-depth information on the status of your customer base. Customer entry can be adapted to include only the fields you desire, including many available user defined fields, for storage of data relevant to your specific business only.
Customers include all individuals or companies to whom you sell your goods or services. You should to set up customers if your goal is to:
| · | Simplify the sales process on repeat customer orders.
|
| · | Build a marketing database to announce special offers to repeat customers.
|
| · | Analyze the type of customers who are buying from you (e.g. the city they reside in, average age, gender, buying habits, etc.)
|
| · | Accept customer payments for future orders
|
| · | Receive partial payment on invoice transactions
|
| · | Bill a customer for sales made and send periodic statements
|
| · | Provide an easy lookup of a repeat customer's entire past sales history
|
| · | Track incidents and resolutions for a specific customer
|
| · | Deal with tasks for the customer (i.e. call back, service calls, etc.)
|
| · | Control a customer's credit limit to prevent invoices from being created when a certain balance is reached
|
| · | Separate the invoice process from the payment receipt process
|
In this Topic
Standard vs. Wizard Entry
Field by Field Help - Customer screen
Sub-Accounts
Field by Field Help - Sub-Account screen
Q & A - Customers
Related Topics
2.7 How to Use Lists
3.8 Setup Options
4.2 Customer Templates
4.3 Prospects
4.4 Customer Care
4.14 Advertising Codes
4.16 Class Codes
Standard vs. Wizard Entry
The first time a new customer record is created, the program will ask whether to start in Wizard Entry mode or in Standard Entry mode. If Wizard Entry mode is chosen, the program will then walk the user stepwise through entering a new customer (see Figure 4-1).
If Standard Entry mode is chosen, the program will present the user with a multi tab form with fields to fill in (see Figure 4-2). The user can complete the appropriate information on each tab and press <Enter> or click the save button to save the information.
Customer Entry mode can be changed at any time in the Customers and Prospects category of Setup...Options.
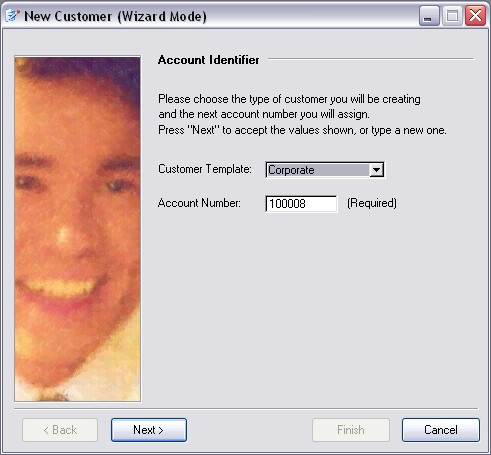
Figure 4-1. New Customer (Wizard Entry)
Field by Field Help - Customer screen
Buttons (List Mode)
View Activity Log
Click this button to view the activity log for this customer record, which denotes any changes made to any field in the record.
Attach documents to this record
Click this button to view or attach documents to this record in the Intellifile Explorer.
Purge Customers
Click this button to purge customers or to mark customers inactive. You can purge or mark customers based upon IntelliQuery selections or based upon the last activity date in the customer record. This button is found only on the Customer List window.
Send Records to Lists & Labels Manager
Click this button to send the selected record to the Customers Lists & Labels Manager so that it can be included in the next printing of labels for customers.
Additional buttons (Standard Entry Mode)
Find Customer by Reverse Phone Lookup
Click this button to speed data entry by looking up the customer's home phone number on the Internet. Should a match be found, the customer name and address information can then be imported directly to the new customer record. Note that this will not work for private phone numbers.
| Because the information used in the reverse phone lookup is provided by a third party, we cannot guarantee that the information will always be available.
|
General
Customer Template
Select a template for this customer. Selecting a valid template will provide default values for many fields on the form.
Account No.
Enter the alphanumeric identifier for this customer's account record. The program will automatically maintain the series, if numeric account numbers are used. The next account number is displayed/set in the Customers and Prospects category of Setup ... Options. This value may optionally contain a check digit for accuracy when entering account numbers.
Company Name
Enter the name of the customer's company, if applicable.
Mr./Mrs./...
Select a title for the customer or enter one of your own, if applicable.
First Name
Enter the customer's first name here, if applicable.
MI
Enter the customer's middle initial here, if applicable.
Last Name
Enter the customer's last name here, if applicable.
| At least one name (company or individual) must be provided for every customer.
|
Bill To
Enter the customer's address here. The first two lines can hold the street address, while the last line holds city, state, and zip code information.
| As with most address fields in the program, if you type the zip code into the city field, the city, state, and zip code will all fill in automatically.
|
Display Map
Click this button (found in the customer label) to display a map of the customer address.
Ship To
Click this button to view the shipping information for this customer. You can then copy the billing address over as the ship to address, or enter an entirely new address. You can also put individual transaction notes, a freight account number for recipient or third-party billing, and a contact phone number that will be used whenever you utilize a shipping method on any invoices from this customer.
Work Phone
Enter the customer's work phone number here. This value can be used to search for a customer on the Customer Care screen.
Home Phone
Enter the customer's home phone number here. This value can be used to search for a customer on the Customer Care screen.
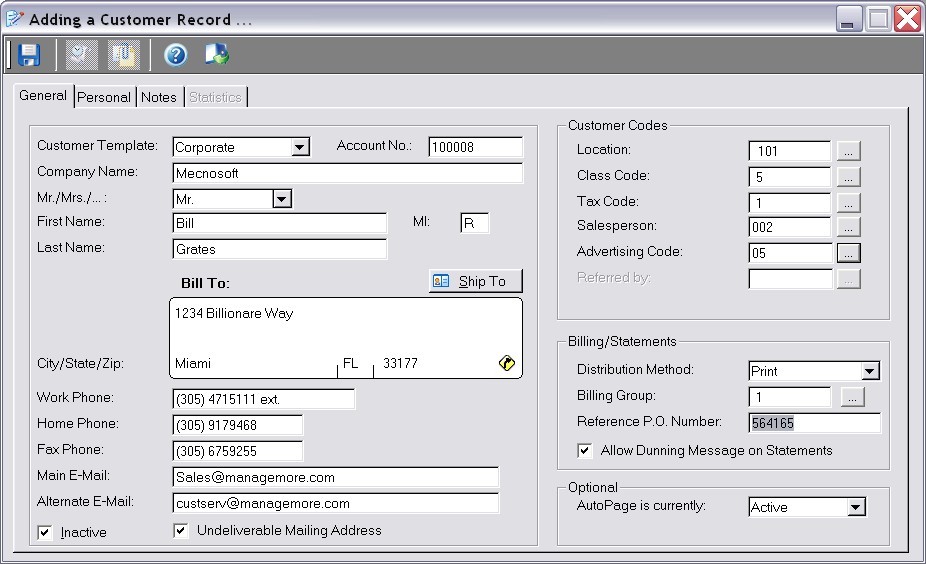
Figure 4-2. New Customer (Standard Entry)
Fax Phone
Enter the customer's facsimile phone number here, if applicable. This value can be used to search for a customer on the Customer Care screen.
Main E-Mail / Alternate E-Mail
Enter the customer's e-mail address(es) here. These values can be used to search for a customer on the Customer Care screen. These values are also accessible to the address book and bulk e-mail features of the program. Additional e-mail addresses can be entered in the additional contacts section of this form.
Inactive
When checked, turns the entire account inactive. It will no longer appear on any lookup lists.
Undeliverable Mailing Address
When checked, will denote this customer as having an address where mail was sent and returned.
| You can press <Ctrl+M> to use a calculator on all numeric fields and <Ctrl+N> for a calendar on all date fields anywhere in ManageMore. This will fill in the calculator result or the calendar selection into the current field. To remember these convenient keys, think of "M" for Math and "N" for caleNdar. You can also click the date button next to most date fields.
|
Customer Shipping Info
This window is viewed by clicking on the Ship To button on the General tab of the Customer Record.
Allow alternate shipping information
Check this box to enter shipping information when the customer's shipping and billing information are different. Note that when this checkbox is turned on, any changes made to the billing information do not come over to the shipping information. This box must be checked to access the remaining fields on this window.
Company Name
Enter the name of the company to which shipments will be made.
Contact Name
Enter the name of the receiver of shipments here.
Copy Bill To Address
Click this button to copy over the Bill To address for the customer.
Ship To
Enter the physical address where shipments for this customer are to be made.
Contact Phone
Enter the phone number to be used for the contact listed.
Transaction Notes
Enter any transaction notes that should appear on this customer's invoices only. This set of notes will override any transaction notes that have been entered in the Form Setup for sales invoices. This can especially be used for special shipping or handling instruction for the carrier.
Bill Freight Acct No.
Enter the customer's shipping account number here. This number can be used when processing shipments to bill the customer for freight charges.
Customer Codes
Location
Enter or select a default location for this customer. This value may optionally determine invoice and/or payment location when this customer is selected.
Class Code
Enter or select the class code number for this customer. Class codes are used to separate customers with different pricing structures.
Tax Code
Enter or select the tax code for this customer.
Salesperson
Enter or select the employee ID of the salesperson employee assigned to this customer, if any. This value may optionally determine the salesperson value on transactions.
Advertising Code
Enter or select the advertising code that explains how the customer heard of you. This is useful, with associated reports, in determining what advertising methods are providing results for your company.
Referred by
If a referral type advertising code is selected, enter or select the customer's account number here that referred this customer. This value may optionally cause a referral credit to be posted to the referring account number.
Territory ID
Enter or select the territory ID this customer is a part of.
Billing/Statements
Distribution Method
Select the method by which this customer most commonly receives monthly billing statements. The distribute statements process will select customers by this distribution method.
Billing Group
Select or enter the billing group applicable for this customer. Statement processing is performed for each unique billing group separately.
Reference P.O. Number
Enter a standing purchase order number provided by this customer, which will be used for recurring charges billed to this customer.
Allow Dunning Message on Statements
When checked, allows for messages to be printed on the customer's statement based on the oldest aging range in which the customer has a balance. If unchecked, no messages will appear on this customer's statements.
Optional
Industry Settings
Depending upon the industry modules you have licensed, one or more industry-specific fields may be included here.
Password
Enter a password for the customer here. This value may be optionally displayed on the Customer Care screen for account security. Additionally, this password can be used by the e-commerce feature to restrict on account orders.
Driver License Information
License Number
Enter the customer's driver's license number here. This value may be optionally displayed on the Customer Care for account security.
Expiration Date
Enter the driver's license expiration date here.
State Issued
Enter the postal abbreviation of the state in which this license was issued.
Legal Information
Customer Since
This field contains the date on which this customer was added/converted from a prospect. You may edit this date which is used for informational purposes.
Tax Id
Enter the tax identifier issued to this customer by the taxing authority. This value is used to keep a copy of the exemption certificate number used for those customers who have tax exemption. This value may be optionally displayed on the Customer Care for account security.
Social Security No.
Enter the customer's social security number here. This value may be optionally displayed on the Customer Care for account security.
Date of Birth
Enter the customer's date of birth here. The customer's age will automatically be computed.
Invoices
Credit Hold after XX days past due
When checked, the program will not allow any invoices to be applied to this customer's account if other unpaid invoices are the selected number of days past due.
Allow C.O.D. Purchases
When checked, allows this customer to pay for invoices via COD (Cash/Check on Delivery). COD purchases are activated when a COD shipping method is chosen on a transaction.
Allow on Account Purchases
When checked, allows for the customer to apply invoice balances to their account. If unchecked, transactions must be paid when created.
Customer Terms
Select the payment terms applicable to this customer.
Customer Credit Limit
Enter the maximum amount this customer can have applied to their balance at any one time.
Currency Code
Enter or select the currency code that would apply to this customer, if any.
Credit Card Information
This information can be recalled for point of sale/payment transactions, and can be used for electronic funds transfer during recurring billing.
Credit Card Type
Select the type of credit card this customer wants to keep on file.
Card Number
Enter the customer's credit card number here.
Expiration Date
Enter the customer's credit card expiration date here.
Bank Account Information
This information can be used for electronic funds transfer during recurring billing.
ABA Routing Number
Enter the customer's bank account routing number here.
Account Number
Enter the customer's bank account number here.
Account Type
Select the account type here -- either checking or savings.
No Checks Until
Enter a date until which the program will not accept check tendered payments from this customer.
Finance Charges
Subject to Finance Charges
When checked, allows the program to consider this customer for finance charges when late payment fees are computed. If blank, no finance charges will be generated for this customer.
Use Individual Finance Charge Rate
When checked, instructs the program to use a different set of finance charge rate criteria for this customer instead of the default amounts.
Minimum Balance for Finance Charge
Enter the least balance required for finance charges to be assessed to this customer.
Finance Charge Amount (percentage) / Finance Charge Flat Rate
Enter the percent of the customer balance and/or the flat dollar amount to be charged to the customer when they are to be assessed finance charges. If both have entries, the program will assess the higher of the two.
Notes
Enter any comment or note on the customer here. These comments are visible when this customer is selected in the Customer Care window.
Details
This section displays any user-defined fields that have been set up for use on customers/prospects. User-defined fields can contain any extra information that you wish to store. You can activate and create user-defined fields in the Customers and Prospects category of Setup ... Options.
Other Contacts
You can enter up to five different additional contact methods. For each, you can set the following fields:
Contact Method
Enter the method of contact that the customer has here.
Contact Type
Select the type of contact here. Choose from Phone, Fax, E-Mail, Website or Other.
Contact Details
Enter the actual contact information (such as the phone number or e-mail address) here.
Statistics
This section allows you to view and/or edit statistics for this particular customer. These values are automatically maintained by the program, based on transactions entered. You can view/edit monthly sales and returns totals from the current year in which this customer had a transaction and the year prior. You can also view/edit other general statistics for this customer provided in this section.
NAICS Code
Enter or select a valid NAICS code to classify this customer by the industry that they belong to. NAICS stands for North American Industry Standard Classification.
View Chart
Click this button to view the statistical information presented here in a chart on screen.
Sub-Accounts
If you have a customer or customers with many departments or divisions (i.e. a hospital, large company, bank, government, government agency), you can introduce sub-accounts. Sub-accounts simply divide the main account under which they are found. All transaction balances are applied to the main account, but recurring charges and invoices can be created for a specific sub-account, to reflect a unique shipping address or division. Statements will be organized by sub-account.
To create a sub-account for this customer, click on the Sub-Account tab and then click New. The use of sub-accounts must be activated in the Customers and Prospects category of Setup ... Options.
Field by Field Help - Sub-Account screen
Sub Account No.
Enter a unique alphanumeric identifier for this sub-account. This value provides a sort order for statement processing.
Sub-Account Name
Enter a name for this sub-account here. This value will be displayed on statements and service records which use this sub-account.
Contact Name
Enter the name of the person you should contact with questions about this sub-account.
Alternate Ship To
Enter an alternate ship address here with the first two lines containing the shipping address, and the last line containing the city, state, and zip code. Or you can click the button to the left of the address to copy in the billing address.
| As with most address fields in the program, if you type the zip code into the city field, the city, state, and zip code will all fill in automatically.
|
|
|
|
|
Enter instructions that will print on the invoice for shipping purposes. (e.g. "Deliveries in Rear")
Contact Phone
Enter the contact's phone number here. This is also used with some shippers who require a shipping recipient's contact phone number. This field will be used to automatically complete the phone number on sales transactions.
Transaction Notes
Enter any transaction notes that should appear on this subaccount's invoices only. This set of notes will override any transaction notes that have been entered in the Form Setup for sales invoices.
Sales Person
Enter or select the salesperson for this particular subaccount. If this field is left blank, ManageMore will use the salesperson on the parent account whenever necessary.
Q & A - Customers
Q01. Certain customer records in my database are no longer used. How do I get rid of them?
A01. For Database Integrity reasons, you cannot easily delete a customer which has been subject to activity (e.g., invoices, payments, services, etc.); you can mark the records inactive, however. In addition, a purge customer toolbar item does exist on the customer list window for removing large amounts of inactive customer accounts, based upon either an IntelliQuery selection or last activity date.
| Q02. | Can the program automatically determine the customer's tax code, based on where they live?
|
| A02. | Yes. Set the switch to do so, found in the Customers and Prospects section of Setup ... Options.
|
| Q03. | How can I prevent certain users from changing/viewing certain customer information?
|
| A03. | There are several resources on the customer screens that can be locked, using the Security Administrator.
|
| Q04. | Can I use letters to make up a customer account number?
|
| A04. | Yes. Simply type over the default account number with any series of numbers and/or letters.
|
|
|
| Q05. | My customer account numbers had special significance in my old accounting software. Is this a good practice in ManageMore?
|
| A05. | No. Since an account number cannot be changed later, you should avoid poor practices of numbering accounts by using the phone number, social security number, drivers license number, etc. ManageMore already provides many lookup fields and user-defined fields for storing critical data. Therefore, most companies will want to use the pre-filled, sequential account number with an optional check digit.
|
Q06. I don't see my question here. Where else can I get information?
| A06. | Visit our website's Technical Support section.
|