Menu Navigation
Lists ... Human Resources ... Employee List
About Employees
Employee records are maintained in the program, and serve a variety of functions. Information about personnel is stored on this record, as well as information related to the organization, commission levels, e-mail settings, payroll, attendance, and the applicable employee department.
| Employees are directly related to users in the program's User Security system, and must be entered prior to entering users in the Security Administrator program.
|
In this Topic
Field by Field Help - Employee screen
Employee Payroll Setup Wizard
Q & A - Employees
Related Topics
2.7 How to Use Lists
13.2 Employee Departments
13.6 Time Clock
13.9 Sales Commissions
15.2 Users
Field by Field Help - Employee screen
Buttons
View Activity Log
Click this button to view the activity log for this employee record, which denotes any changes made to any field in the record.
Attach documents to this record
Click this button to view or attach documents to this record in the Intellifile Explorer.
Send Records to Lists & Labels Manager
Click this button to send the selected record to the Employees Lists & Labels Manager so that it can be included in the next printing of labels for employees.
Enroll Fingerprint for Employee
Click this button to enroll fingerprints for the selected employee. The enrollment of fingerprints is required prior to utilizing them for the timeclock or security functions of the software. You will have to have your biometric device installed on the workstation prior to utilizing this feature.
Enrolled Fingerprint List
Click this button to view a list of fingerprints that have been enrolled in the software. You may delete fingerprints for employees from this list in order to re-enroll them from here.
Security Administrator
Click this button to immediately access the Security Administrator program.
General
Employee Id
Enter an alphanumeric identification of the employee you are creating a record for here. Some companies like to use the employee's initials in this field for easy identification.
| Employee IDs must be unique among all employees. Once the employee has become inactive (by unchecking the Employed checkbox below), the employee ID can be reused. Take caution, however, because the employee ID is stamped on many records, including all transactions. This means that quickly reusing an employee ID can cause confusion. Keep in mind that you can always use numeric values in this field.
|
Full Name
Enter the employee's full name here. Entering this value prior to entering initials will enter the initials automatically.
Employee Address
Enter the employee's mailing address here. The first two lines will accommodate the street address, and the last line contains the city, the state, and the zip code.
| As with most address fields in the program, if you type the zip code into the city field, the city, state, and zip code will all fill in automatically.
|
Employee Image
Click in the box provided to explore the system for an image file to associate to your employee.
Individual is currently employed with company
When checked, indicates the employee is currently working for your company.
Individual to be used as salesperson reference throughout program
When checked, indicated the employee's initials can be used as the representative on an invoice. This field must be checked to allow commissions for this employee.
Individual has been assigned security rights for entry to program
Displays whether the employee has been added to the Security Administrator.
Restrict department tasks from being assigned to this individual
When checked, the program will skip this employee when assigning tasks to an employee department.
Personal
Home Phone
Enter the employee's home phone number here.
Cellular Phone
Enter the employee's cell phone number here.
Other Phone
Enter another contact telephone number here.
Social Security No.
Enter the employee's social security number here.
Driver License No.
Enter the employee's driver license number here.
Date of Birth
Enter or select the employee's birth date here.
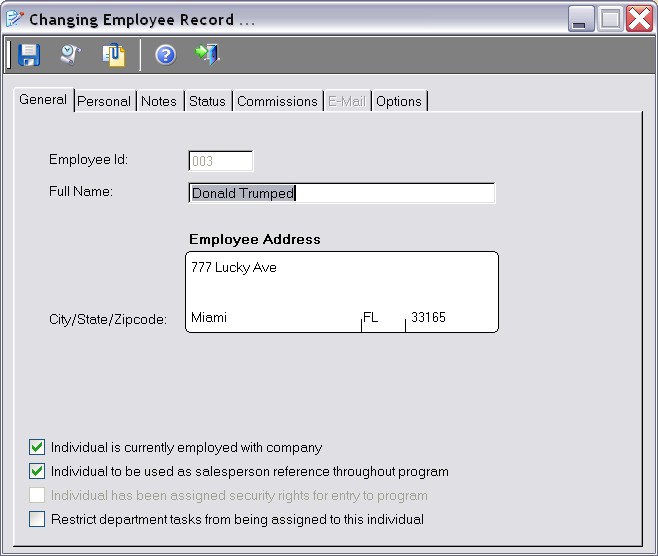
Figure 4-11. Employee screen
Marital Status
Select the employee's marital status: single or married.
Gender
Select the employee's gender here.
No. of Dependents
Select the number of dependents that this employee declares.
Notes
Enter any miscellaneous notes about the employee here.
Status
Department Code
Enter or select the code for the department this employee belongs to. This value is used to group employees for task assignment and/or e-mail sending.
Job Title
Enter the employee's job title here.
Business Phone / Ext
Enter the employee's work phone number and/or extension.
Date Hired
Enter or select the date on which this employee was hired.
Last Raise Issued
Enter or select the date on which this employee got his last increase in salary.
Terminated On
Enter or select the date on which this employee was terminated, if applicable.
Setup Payroll
Click this button to start the Employee Payroll Setup Wizard which will help you enter data related to your employee's payroll status with the company.
Commissions
Employee commission is calculated using Commission Level...
Select the commission level that is used to compute commissions for transactions with this employee's initials in the salesperson field.
Employee commission is also calculated using Commission Level
Select the commission level that this employee will also receive when either of the rules following is true. Mainly used for department head or store manager.
when sales are made by other employees in department
States that additional commission should be paid to this employee whenever any employee in the department selected makes a commissionable sale.
or when sales are made by other employees in location
States that additional commission should be paid to this employee whenever any employee in the location selected makes a commissionable sale.
This tab will be activated only if the employee has been assigned security rights in the program (i.e. they have been added as a user in Security Administrator).
Allow this employee to receive internal ManageMore E-Mail
When checked, allows the employee to send and receive messages from other employees using the program's e-mail system.
E-Mail Accounts
Click this button to assign this employee to an e-mail address.
Return E-Mail Address
Enter the e-mail address that will be seen on the "From:" line when sending external e-mail
Name used for sending
Enter the name that will be seen on the "From:" line when sending external e-mail.
Always use external e-mail address for this employee
When checked, will always use the external e-mail address to deliver messages to this employee. Useful for traveling salespeople or others who may not always have access to the program's internal e-mail.
Allow this employee to send E-mail to:
When the individual check boxes are checked, allows the employee to send e-mail to Customer and Prospects, Employees, Departments, and/or Vendors. If unchecked, the employee will not see the recipients in their address book, and will not be permitted to send mail to those recipients.
Organizer Options
Click this button to set up sending and receiving e-mail settings for this employee.
Details
This section displays any user-defined fields that have been set up for use on employees. User-defined fields can contain any extra information that you wish to store. You can activate and create user-defined fields in the Employees section of Setup ... Options.
Options
Default Toolbar Template
Select a Toolbar Template to automatically adjust the employee's toolbar settings as defined by the template.
Window to open at login
Select the window within the program that should automatically open when this employee logs in.
Employee Payroll Setup Wizard
This wizard is intended to help you enter payroll and/or time and attendance information for your employees. You may choose to enter only pertinent information about your employee's schedule, or take advantage of the full offerings of the wizard to enter all of the wage information that you will need when payroll is processed.
Welcome Screen
Track time and attendance for this employee
Check this box to allow recording of time clock punches for this employee as well as optionally entering expected attendance times for them.
Calculate payroll for this employee
Check this box to have ManageMore determine the amount of pay your employee should receive for their attendance in a given time period.
Note: At least one of these checkboxes must be marked in order to proceed to the next screen.
Pay Cycle and Location
Cycle Code
Enter or select the payroll cycle code that corresponds with the frequency that this employee gets paid.
Payroll Location
Enter or select the location to which payroll expenses should be charged to.
This employee is exempt from overtime
Check this box to have ManageMore pay an employee the same rate regardless of the number of hours worked in a given pay period. This checkbox must be turned off for the next field to be available.
Overtime is earned when ... hours exceed
Select the number of hours after which overtime is earned in a given period. Select from cycle, day, or week as the given period.
Wages
Note: This screen will appear only if the Calculate payroll for this employee checkbox was selected in the first step of the wizard.
Wage Pay Code
Enter or select the wage pay code that corresponds with the manner in which this employee gets paid for regular work hours.
Wage Rate
Enter the amount the employee should be paid for each unit of time defined in the wage pay code. This amount will be filled in by default from the pay code record.
Sick Pay Code
Enter or select the wage pay code that corresponds with the manner in which employees get paid for sick hours.
Vacation Pay Code
Enter or select the wage pay code that corresponds with the manner in which employees get paid for vacation hours.
Holiday Pay Code
Enter or select the wage pay code that corresponds with the manner in which employees get paid for holiday hours.
Time Clock Information
Time Clock ID
Enter the ID that this employee will use when clocking in or out of ManageMore. This need not be the same as their login ID, should the employee be set up as a user in Security.
Password
Enter the password that the employee will use when clocking in or out of ManageMore.
The remaining fields on this screen are optional.
Start Time / End Time
Enter the time when this employee will normally begin and end their shift. Entering a value here will allow ManageMore to compare punch times against the set beginning and ending times for auditing purposes.
[Days of the Week]
Check the days when this employee is scheduled to work. Checking days here will allow ManageMore to compare punch dates against the set days of the week for auditing purposes.
Cycle Minimum Hours
Enter the fewest number of hours an employee can work in a given cycle and still be considered fully present.
Cycle Maximum Hours
Enter the greatest number of hours an employee should work in a given cycle and still be considered within their scheduled allotment. This will not calculate overtime for an employee, it is strictly meant for alerting users who access the timesheets as to conditions where employees are working more than their scheduled hours.
Daily Maximum Hours
Enter the greatest number of hours an employee should work in a given day and still be considered within their schedule allotment. This will not calculate overtime for an employee, it is strictly meant for alerting users who access the timesheets as to conditions where employees are working more than their scheduled hours.
Q & A - Employees
Q01. The e-mail settings are not available for certain employees. Why not?
A01. Employees must also be setup as Users in Security Administrator, for E-Mail features to be available. Be sure to enter the employee using the same employee ID in both programs.
Q02. How do I control employee access?
A02. Once an employee has been created, you can then add a security user in the Security Administrator program. On the user record, enter the employee ID in the field provided. This will establish the link. The Security Administrator controls access to the program by unlocking program resources for users, and/or assigning the user to one or more groups with unlocked resources.
Q03. I hire temporary employees for the holiday seasons, when our sales volume is much higher. Should I enter them as employees? Is there a way to define them as temporary?
A03. You should enter anyone who is going to working directly for you as an employee. They can be defined in the program as a temporary worker by creating a new employee department specifically for temporary employees, or they can also be placed in the department they are working in. With respect to security, you can set their security profile up to expire after a certain date, so they can no longer log into the program after that date has passed.
Q04. Can I delete employee information for old employees that are no longer with our company? I would like to reuse an employee ID.
A04. You can delete employees if you want to. However, we highly suggest you make old employees inactive (by unchecking the "employed" checkbox), after which the employee's ID can be reused.
Q05. Can I keep employee performance reports in the program?
A05. You can keep information like this in the notes tab of the employee record.
Q06. I don't see my question here. Where else can I get information?
A06. Visit our website's Technical Support section.