Menu Navigation
File ... Export Database ...
Reports ... Report Explorer
Lists ...
About Exporting Data
Depending upon your need, ManageMore allows several ways to export your data for use with other software products. ManageMore can even export data directly into such popular formats as Microsoft Excel and Adobe Portable Document Format (PDF).
| Exporting data requires the optional File Export module to be included with your license. If you need to license this module, please speak with your sales representative.
|
|
|
|
|
| In this Topic
|
| Exporting List Data
|
| Field by Field Help - File Export selection screen
|
| Field by Field Help - File Export Wizard
|
| Exporting Reports
|
|
|
| Related Topics
|
16.2 ODBC Database Access
16.3 File Transfers (FTP)
Exporting List Data
ManageMore features the ability to export your data lists to file, which can then be read by another software package. You can export lists to a CSV file (Comma-Separated Value), HTML Document (Hyper Text Markup Language), XLS file (Microsoft Excel), TXT file (Tab-delimited), or DBF file (dBase III file). To export data, simply navigate to the Lists menu item which contains the data you are requesting. Then, click the Export button, and you can create, edit or delete custom export layouts. The program includes an easy to use File Export Wizard (see Figure 3-15), which will walk you through creating and saving a custom export layout that can be reused.
| All of these files can be opened by Microsoft Excel. Consult your office software package's help documentation to find out what kind of files it is capable of reading.
|
Field by Field Help - File Export selection screen
Buttons
New
Create a new File Export template using the File Export Wizard.
Copy
Copy the contents of the highlighted File Export Template with a different description name.
Edit
Edit a currently saved File Export template using the File Export Wizard.
Rename
Renames the currently highlighted File Export Template.
Delete
Delete a currently saved File Export template.
Select
Run a currently saved File Export template.
Close
Close the File Export window and return to the previous list window.
Field by Field Help - File Export Wizard
Add
Add the currently selected field to the export template.
Remove
Remove the currently selected field from the export template.
Up
Move the column to the left in the export template.
Down
Move the column to the right in the export template.
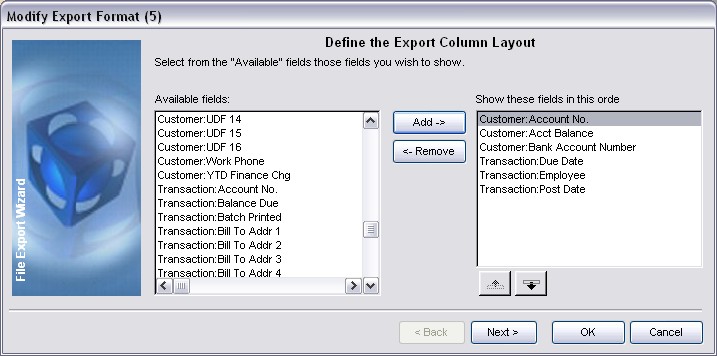
Figure 3-14. File Export Wizard
Sort Order
Select a Sort Order for the Export
This step will give you three options to sort your exported information:
| Default Sort Order | Choose this to sort your exported data in the same order that the program originally selected for this list.
|
|
|
| Select a Predefined Sort Order | Choose this to sort your exported data by one of it's indexes.
|
|
|
| Define Your Own Custom Sort Order | Choose this to sort your exported data in any order you want. Should you choose this option, you would then click on the Define Sort Order button, and then choose up to four fields that ManageMore will sort this list by.
|
Define Sort Order
Click this button to define a custom sort order. This button will appear only if Custom Sort Order is chosen.
Spreadsheet Template
Template File
Select or enter the full path and filename of the template file that ManageMore should fill directly into when exporting data. Leave this blank if no template file is desired.
Starting Row
Select the row number ManageMore should begin filling the spreadsheet in at.
Starting Column
Select the column number ManageMore should begin filling the spreadsheet in at. Use column 1 for A, 2 for B, etc.
Export Selection
File Type
Select the file type to be used for export. Choose from CSV, HTML, XLS, TXT, or DBF file (explained above).
Destination
Select what should happen to this file once it is created. Choose from the following:
| Disk File | The export file will be saved to a specified location of your choosing.
|
|
|
| E-Mail Attachment | The export file will be created and attached to an e-mail message. You may then send the e-mail to whomever you wish.
|
|
|
| FTP Server | The export file will be created and sent to an FTP Server via the Internet.
|
|
|
| Run Associated Program | The export file will be created and will then be run by the program that is set to do so on this machine. File association information is controlled from within Windows Control Panel.
|
|
|
When exporting to a disk file, enter the full path name (i.e. C:\REPORTS\LIST.XLS) that you want ManageMore to save this file as. You may also use the button at the end of the field to explore for the file.
When exporting to an FTP Server, enter the name that you want the file to be placed under on the FTP server. Be sure to conform to any naming rules your FTP server has in effect.
FTP Profile
Choose the FTP profile that contains the FTP server name you want this file to be sent to. FTP Profiles are created in Setup...Options...FTP.
OK
Click this button to accept the criteria and perform the export.
Cancel
Click this button to cancel the process and return to the previous window.
Exporting Reports
ManageMore features the ability to export your reports to file, which can then be read by another software package. You can export reports to a PDF file (Portable Document Format -- readable with Adobe Acrobat), CSV file (Comma-Separated Value file), or Tab-delimited file (the last two files can be read with any spreadsheet or database application, such as Microsoft Excel and Access).
The information you get in an exported report is far greater than that in the printed report because there are no boundaries for printing. Thus, many more fields will be available, making it better for customized reports using templates in Microsoft Excel or for database functions in Microsoft Access.
To export a report, first find the report you need information from. Fill in the criteria you need for the report, then click on the Export button. Then, complete the export setting:
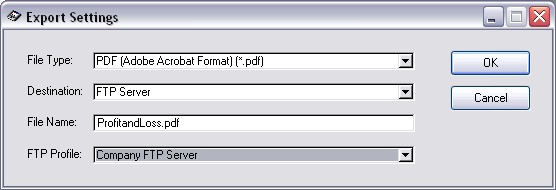
Figure 3-15. Export Settings
File Type
Select the file type to be used for export. Choose from PDF, CSV, or TXT file. For some analysis reports, PDF will be the only option available because of the calculations involved.
Destination
Select what should happen to this file once it is created. Choose from the following:
| Disk File | The export file will be saved to a specified location of your choosing.
|
|
|
| E-Mail Attachment | The export file will be created and attached to an e-mail message. You may then send the e-mail to whomever you wish.
|
|
|
| FTP Server | The export file will be created and sent to an FTP Server via the Internet.
|
|
|
| Run Associated Program | The export file will be created and will then be run by the program that is set to do so on this machine. File association information is controlled from within Windows Control Panel.
|
|
|
When exporting to a disk file, enter the full path name (i.e. C:\REPORTS\REPORT.PDF) that you want the program to save this file as. You may also use the button at the end of the field to explore for the file.
When exporting to an FTP Server, enter the name that you want the file to be placed under on the FTP server. Be sure to conform to any naming rules your FTP server has in effect.
FTP Profile
Choose the FTP profile that contains the File Transfer Protocol server name and directory where you want this file to be sent. FTP Profiles are created in Setup...Options...FTP.
OK
Click this button to accept the criteria and perform the export.
Cancel
Click this button to cancel the process and return to the previous window.