Menu Navigation
File ... Import Database ...
About Importing Data
ManageMore allows you to import data into the primary tables in the company database. You can import from almost any source file available. The program includes a Data Import Wizard, which walks you through defining your data which is being imported. Once your source data is understood, the program will build a list of the data to import for preview. The records can then be posted to the database for permanent entry.
In this Topic
Quick Help - Importing Data
Data Import Lists
Data Import Wizard
Import Prospects
Import Customers
Import Inventory
Import Vendors
Import Transactions
Import Payments
Import Incidents
Related Topics
4.1 Customers
4.3 Prospects
9.1 Supertrack Inventory
Quick Help - Importing Data
| 1) | Select the File ... Import menu option for the records desired. (i.e. Import Customers, Vendors, etc.)
|
| 2) | Click the Build List button to select the criteria for import.
|
| 3) | If necessary, create a New import setup and define your file structure, using the Data Import Wizard.
|
| 4) | Select the file to be imported, any default values, and click the Begin button.
|
| 5) | Review the list of records to be imported. Edit and Delete records as necessary.
|
| 6) | Click the Post button to import the items into the database.
|
Data Import Lists
When you click into any of the five import lists in ManageMore, you will be presented with the list of records to be imported. If you have not yet built a list of records to import, the list will be empty. To begin, click the Build button. You will be asked for a file layout, and the file to be imported, as well as default values to use for data being imported. To define the layout of your import file, select *Add New*, and the Data Import Wizard (see below) will evaluate your file and assist in defining its layout.
After building the list to import, you can review the records to be imported, and edit and delete records as necessary. When you are satisfied with the results, click Post, and the records will be imported into your company database.
Data Import Wizard
The data import wizard (see Figure 3-14) will guide you through the steps of defining your file's contents. The program will make a record of your choices and save them for future use. During this process the program will analyze your file, and make the best guess as to the file's contents. You can then clarify the choices to determine the exact makeup of your data.
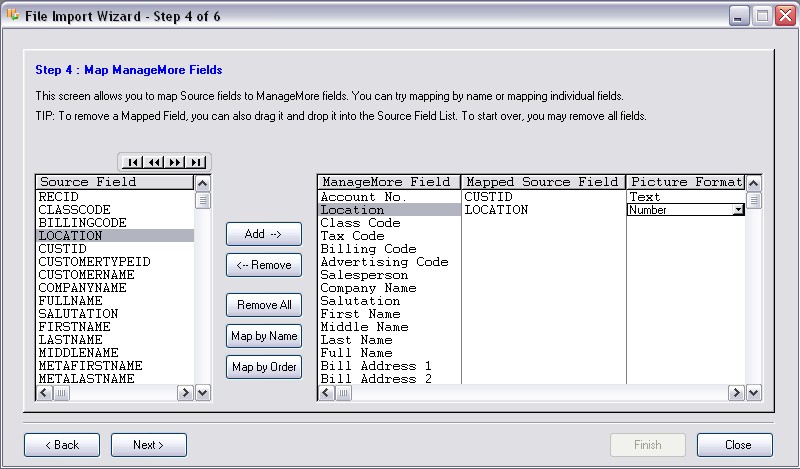
Figure 3-13. Data Import Wizard
Step 1: Select Import File
Import File
Enter the full path name of the file you wish to import (e.g. C:\DATA\CUSTOMER.CSV). You may also use the lookup button at the end of the field to search for the file.
End of Record
Choose what will denote the end of a record in the import file. Choices are CR-LF (Carriage return then line feed), LF (line feed), CR (carriage return), LF-CR (Line feed then carriage return), and FF (form feed).
Remove any padded spaces in fields
When checked, the program will ignore any spaces that end a field record in the import file. This option is recommended, since the program normally stores data without padded spaces.
Allow validation and/or data replacement during import
When checked, will allow the user to validate and replace data that will be imported into the program through a series of rules. This check box must be checked to view steps 4a and 4b.
Analyze fixed-width file
When checked, the program will search through the import file to try to determine where the fields begin and end in each row.
Step 2: Select File Delimiter Type
Original Data Type
Choose the type of data this file contains:
| Delimited | A character or characters separate each field, such as commas, tabs, spaces, etc.
|
|
|
| Fixed Width | The fields in this file all start at the same column number in each line.
|
|
|
Choose the row number where your import information starts. Use the preview window below to view the file, starting from the row you chose.
Step 3: Set Data Delimiters
Delimiters
Choose the character(s) that separate one field from the next. You may choose as many as needed. Select from tab, comma, semicolon, space, or another character you define.
Treat Consecutive delimiters as one
When checked, the program will assume multiple delimiter characters in a row do not have individual columns between them.
Text Qualifier
Choose the character that denotes that data found in a field is text data.
First Row contains field names
When checked, the program will assume that the row first consists of the field names and not actual data.
Data Preview
The program will show you a preview of how your data import file looks when the criteria that have been entered so far are applied to it.
Step 4: Map Fields
This step is critical to determine where the data will go upon import. If your column headers contain the same names as the program, this step will be done automatically. Otherwise, you must tell the program where to find each particular field.
Add
Click this button to link the highlighted field in the Source Field column to the highlighted Program Field. You may also click on the field directly and drag it on top of the desired field on the right side.
Remove
Click this button to unlink the source field from the highlighted ManageMore source field. You may also click on the field directly and drag out of the ManageMore field on the right side.
Remove All
Click this button to unlink all of the source fields from the ManageMore fields.
Map By Name
Click this button to link the fields based upon the similarity in their names.
Map by Order
Click this button to link the fields in order of their appearance, i.e. the top Source Field will link to the top ManageMore field, etc.
To aid in your view of the data, there are four buttons at the top of the Source Field window. Use these buttons to view the records one by one. In order, clicking the buttons will go to the first record, the previous record, the next record, and the last record.
Step 4a: Set Validation Rules
Validation rules are only visible if the check box labeled "Allow validation and/or data replacement during import" is checked on. These rules are useful to skip certain rows, include only certain rows, or replace data being imported.
Allow rows to be skipped
When checked, will allow the user to set criteria for rows to be skipped during data import. This must be checked on to access the top half of this window.
Make row skipping case sensitive
When checked, the program will look at two words spelled the same way being different if there is a difference in the case on any one of the letters. In other words, "EXACT" and "Exact" would be different.
Source field
Choose the source field whose data will be used to determine if the row is to be skipped.
should contain exactly
Enter the data that the source field should contain in order for that row to be skipped.
Reset
Click this button to clear all of the data in this section of the window.
Allow rows to be validated
When checked, will allow the user to set criteria for rows to be validated during data import. This must be checked on to access the bottom half of the window.
Make row validation case sensitive
When checked, ManageMore will looks at two words spelled the same way being different if there is a difference in the case on any one of the letters. Therefore, "EXACT" and "EXACt" would be different.
Source field
Choose the source field whose data will be used to determine if the row is to be validated.
should contain exactly
Enter the data that the source field should contain in order for that row to be validated.
Reset
Click this button to clear all of the data in this section of the window.
Step 4b: Set Data Replacing Rules
Insert Rule
Click this button to add a data replacing rule to the highlighted field.
Change Rule
Click this button to modify an existing rule on a highlighted field.
Delete Rule
Click this button to delete the highlighted rule.
When in the rule screen:
Rule No.
Displays the auto-generated number assigned to this rule.
Priority
Select the importance of this rule compared to other defined rules. Priority can be set from 1 to 100, with 100 being the most important.
Rule Type
Select the data replacement rule type that you want for this field. Select from replace (one item is replaced with another), append (add additional data at the end), or prepend (add additional data at the beginning).
When using the replace rule type, you will see the following field:
The element containing XXX should be considered YYY
Enter the text to search for in the XXX box and replace it with the text in the YYY box.
When using the append rule type, you will see the following field:
Append field
Select the field that should be appended (put on the end).
When using the prepend rule type, you will see the following field:
Prepend field
Select the field that should be pre pended (put at the beginning).
Comment
Enter a comment (for your personal use) here.
Step 5: Preview Data with Applied Settings
In this step, you will be able to see your data as the program sees it with the rules you have applied. You may use the arrow buttons in the upper right corner to navigate through the data you are going to import. In order, these buttons when clicked will go to the first record, go to the previous record, go to the next record, and go to the last record.
If you notice anything wrong or do not like how the program has set everything, click the Back button to go back and make any changes you want. Otherwise, you can click Next to go to the last step, or Cancel to stop the whole process.
Step 6: Save File Import Settings
Description
Enter a name for this set of import settings. This name will be visible on drop lists for import settings names.
Once you have entered a name for the settings particulars, you can then click the Finish button. Your settings will be saved and can be brought up again at any time you have a file that is similar in format by clicking on the name of this import setting in the drop lists provided.
Import Prospects
When you build the import prospect list, you will see the following fields that will need to be filled in so that ManageMore can read your data properly and to provide default values for your prospects:
Prospect Import Setup
Select the import setup which describes the source data file. Choose *Add New* to define a new file layout.
Source File
The file from which the program will read data. You may accept it as it is, or select the lookup button to find another file that will be read the same way.
Location
Enter or select the location number for the prospect to be imported.
Class Code
Enter or select the class code number for the prospects to be imported.
Billing Group
Enter or select the billing group number for the prospects to be imported.
Advertising Code
Enter or select the advertising code for the prospects to be imported. If none is selected, then no advertising codes will be imported by default. The advertising code, however, is not a required field.
Salesperson
Enter or select the employee ID of the salesperson for the prospects to be imported. If none is selected, then no salesperson will appear by default on the prospect's information. The salesperson's ID, however, is not required.
Import list consists of updated CASS certified mailing info only
When checked, ManageMore will consider the information being imported to be updated CASS certified mailing information for existing prospects only and will update those addresses for those prospects only. Using CASS (Coding Accuracy Support System) certified mailing information can provide for a reduced postage fee. Check with your postmaster for more information.
Capitalize all imported prospect names
When checked, ManageMore will properly capitalize the prospect names that are being imported.
Standardize Street Addresses
When checked, ManageMore will set the addresses being imported to the standard used by the USPS (United States Postal Service) for uniformity.
Ignore imported prospects with incomplete addresses
When checked, the program will not import any prospect whose address is not complete, containing a street address and city, state, and zip code.
Check for possible duplication in database
When checked, the program will compare incoming data to that which is already held in the software and that which is already on the list. The program will then alert you to any duplication possibilities by assigning a percentage of likelihood that duplication exists. Exact matches will be assigned 100%, and records with no matching will be assigned 0%. Records with a likelihood of 50% or greater will not be automatically marked for import.
Ignore duplicate records in import file
When checked, the program will check for duplication among records considered for import, and if there are any with a high likelihood of duplication with another record already considered for import, it will be ignored and not imported.
Mark imported prospects as coming from a rented source
When checked, the imported prospects will be marked as rented, coming from a source that rents out lists of prospects for marketing purposes. This is done so that you do not use the names more often than is allowed in your agreement with the source company.
Import Customers
| When importing customers, it is important to note that if the customer record that you are trying to import into ManageMore already exists in the customer list, then the information that you are importing will overwrite (replace) the original customer information. If you do not wish for this to happen, make certain that you look over the list of customer import information carefully and deselect any import records that you do not want to have updated.
|
When you build the import customer list, you will see the following fields that will need to be filled in so that ManageMore can read your data properly and to provide default values for your customers:
Customer Import Setup
Select the import setup which describes the source data file. Choose *Add New* to define a new file layout.
Source File
The file from which the program will read data. You may accept it as it is, or select the lookup button to find another file that will be read the same way.
Location
Enter or select the default location number for the customers to be imported.
Class Code
Enter or select the default class code number for the customers to be imported. If none is selected, the class code must be provided in your data file for each of the customers to be imported.
Tax Code
Enter or select the tax code for the customers to be imported.
Billing Group
Enter or select the billing group number for the customers to be imported.
Advertising Code
Enter or select the default advertising code for the customers to be imported. If none is selected, then no default advertising codes will be provided. The advertising code, however, is not a required field.
Salesperson
Enter or select the employee ID of the salesperson for the customers to be imported. If none is selected, then no salesperson will appear by default on the customer's information. The salesperson's ID, however, is not required.
Territory
Enter or select the territory code that this customer belongs to. If none is selected, then no territory code will appear by default on the customer's information. The territory code is not required.
Bill Distribution Method
Select the method of distribution for statements to be sent to these customers.
Import list consists of updated CASS certified mailing info only
When checked, ManageMore will consider the information being imported to be updated CASS certified mailing information for existing customers only and will update those addresses for those customers only. Using CASS (Coding Accuracy Support System) certified mailing information can provide for a reduced postage fee. Check with your postmaster for more information.
Capitalize all imported customer names
When checked, ManageMore will properly capitalize the customer names that are being imported.
Standardize Street Addresses
When checked, ManageMore will set the addresses being imported to the standard used by the USPS (United States Postal Service) for uniformity.
Check for possible duplication in database
When checked, the program will compare incoming data to that which is already held in the software and that which is already on the list. The program will then alert you to any duplication possibilities by assigning a percentage of likelihood that duplication exists. Exact matches will be assigned 100%, and records with no matching will be assigned 0%. Records with a likelihood of 50% or greater will not be automatically marked for import.
Ignore duplicate records in import file
When checked, the program will check for duplication among records considered for import, and if there are any with a high likelihood of duplication with another record already considered for import, it will be ignored and not imported.
Import Inventory
When you build the import inventory list, you will see the following fields that will need to be filled in so that ManageMore can read your data properly and to provide default values for your items:
Inventory Import Setup
Select the import setup which describes the source data file. Choose *Add New* to define a new file layout.
Source File
The file from which the program will read data. You may accept it as it is, or select the lookup button to find another file that will be read the same way.
Location
Enter or select the location number for the inventory items to be imported. If none is selected, the location must be provided in your data file for each of the inventory items to be imported.
Inventory Template
Choose the default inventory template for each of the items to be imported. The settings found in this inventory template will be applied as default values to the imported inventory items, and used for fields that are not provided in your data file.
Import Vendors
When you build the import vendor list, you will see the following fields that will need to be filled in so that ManageMore can read your data properly and to provide default values for your vendors:
Vendor Import Setup
Select the import setup which describes the source data file. Choose *Add New* to define a new file layout.
Source File
The file from which the program will read data. You may accept it as it is, or select the lookup button to find another file that will be read the same way.
Payment Terms
Select the default payment terms for the vendors you are about to import. These payment terms will be applied to each vendor imported.
Shipping Method
Select the default shipping method for the vendors you are about to import. This shipping method will be applied to each vendor imported.
Capitalize all imported vendor names
When checked, ManageMore will properly capitalize the vendor names that are being imported.
Standardize Street Addresses
When checked, ManageMore will set the addresses being imported to the standard used by the USPS (United States Postal Service) for uniformity.
Import Transactions
Importing transactions require a few more steps and restrictions compared to other imported data. This is because transactions have several complexities that must be considered before importing directly into ManageMore.
Transactions imported can be paid invoices or invoices with a balance. They can also consist of transactions to be created by ManageMore based upon customer information, SKU items, and quantities.
One main step that must be followed is to set your transaction import file up in the ManageMore Interchange Format (MIF). This file layout will allow the importation of transactions that have one or many line items within that invoice with ease. Specifics about how to create a transaction import file in this format are available online at http://www.managemore.com/faqs.
| When importing transactions, it is imperative that the customer account record that is referenced in the imported transactions already exists within ManageMore. In other words, make certain all customers have been entered or imported prior to importing transactions.
|
Source File
Enter or select the full path and filename of the transaction file you are importing.
Transaction Status
Select the status of the transactions you are importing. Choose whether they are Open A/R Invoices (invoices that have not yet been fully paid for) or paid invoices (invoices that have been fully paid with no balance remaining).
Default Location
Enter or select the location number to be used on a transaction if one is not provided in the import file.
Default Salesperson
Enter or select the salesperson ID to use on a transaction if one is not provided in the import file.
Default Terms
Enter or select the terms that should be used on the imported transactions if one is not provided in the import file.
Default SKU Item
Enter or select the SKU item number that should be used on a transaction's detail if one is not provided in the import file.
Default Payment Desc.
Select the type of payment used to fulfill transactions that have had a payment made against them.
Imported customer accounts will use the Customer ... for matching
Select the identifier that is to be used to match an invoice to a customer. Choose from Account Number (default), Phone, Email or other Contact, or Service Extended Description.
Import Payments
When you build the import payments list, you will see the following fields that need to be filled in so that ManageMore can read your data properly and to provide default values for your payments to be entered:
Payment Import Setup
Select the import setup which describes the source data file. Choose *Add New* to define a new file layout.
Source File
The file from which the program will read data. You may accept it as it is, or select the lookup button to find another file that will be read the same way.
When you post the payments list, you will see the following fields that will need to be filled in so that payments can be applied properly to accounts:
Payment Post Date
Enter or select the date on which these payments are said to be effective. This will default to today'sa date.
Default Payment Method
Select a payment method from the list that will be filled in on any payment record where a method is not already defined.
SKU used for Payment Reversals
Enter or select a SKU to be used on an accompanying refund transaction when a negative payment amount is imported. The selected SKU must be intangible. This value will default to the internal Supertrack Inventory record of MISC.
Use SuperSpeed Posting for Very Large databases
When checked, ManageMore will speed up the processing of the imported payments by taking additional resources on the workstation where the importing is being done. No other users should be in the software if you use this setting.
Import Incidents
When you build the import incidents list, you will see the following fields that need to be filled in so that ManageMore can read your data properly and to provide default values for your incident records to be entered:
Incident Import Setup
Select the import setup which describes the source data file. Choose *Add New* to define a new file layout.
Source File
The file from which the program will read data. You may accept it as it is, or select the lookup button to find another file that will be read the same way.