Menu Navigation
Lists ... Scheduled Jobs
About the Job Scheduler
The Job Scheduler allows reports and other processes to automatically be executed at predetermined times. With this valuable option, you can easily set jobs to execute on a recurring basis for a finite or infinite period of time. Scheduled reports can be sent to print, file, or e-mail to a predefined recipient list. Job Scheduler allows the reports you need to be in your inbox without ever having to ask for them again.
| If the optional Job Scheduler feature was not included in your software license, please contact your sales representative.
|
In this Topic
Quick Help - Job Scheduler
Field by Field Help - Scheduled Job screen
Scheduled Jobs List
Field by Field Help - Scheduled Jobs List
Q & A - Job Scheduler
Related Topics
2.11 How to Use Reports and Charts
Quick Help - Job Scheduler
| 1) | Execute the SetSched.exe installation program to install the Job Scheduler software on the computer that will watch for, and execute scheduled jobs. This is usually done on a network server, or dedicated computer.
|
| 2) | To add a job from a ManageMore screen, click on the Schedule button located on the toolbar at the top of many reports and other process criteria windows.
|
| 3) | Enter the parameters for when to run this process, how often to run this process, where to output this process (if applicable) and who to inform if something goes wrong with this process.
|
Field by Field Help - Scheduled Job screen
Save this record
Click this button to save this record and return to the previous window.
Close this window
Click this button to discard your changes and return to the previous window.
Job Name
Enter a name for this job that will be visible on the Schedule Jobs list.
Recurrence
Recurrence Pattern
Choose the frequency with which the recurrence of this process should be run. Choose from the following:
| None | This job will not recur. it will be created and done only once.
|
|
|
| Daily | This job will recur after a certain number of days. Choose whether to have a new job created for each weekday or one job per defined number of days.
|
|
|
| Weekly | This job will recur on certain days of the week, or on one day per defined number of week(s). Choose which days of the week this job should occur on and how many weeks between recurrences.
|
|
|
| Monthly | This job will recur on certain days of the month, or on a certain weekday per defined number of months. Choose the day number of each month and how many months between recurrences, or which weekday in a month and the number of months between recurrences.
|
|
|
| Yearly | This job will recur annually. Choose the month and day of the date on which it will recur, or the weekday and the month in which it will recur.
|
|
|
| After Job | This process will start immediately after another job that has been scheduled has been completed. Choose the job that this new job will follow.
|
Beginning on
Select or enter the date on which this job should first begin.
Start Time
Enter the time when this process should begin. Enter in standard or military (24 hour clock) time.
Range of Recurrence
Choose how many times this job should be created by the recurrence:
No end date This job will continue to recur without end.
End after XX recurrences This job will end after it has run the selected number of times.
End by Enter or select a date by which this job recurrence will end.
Destination
Choose the method by which the results of this job will be outputted. Choose from Printer, Disk File, E-Mail, or FTP.
Printer Options
Printer Name
Enter or select the name of the printer to which the output of this job should be printed.
Disk Options
File Type
Choose the output file type that this process should be created in. Choose from CSV (Comma Delimited), PDF (Portable Document Format), or Text (Tab Delimited).
File Name
Enter or select the full path name (i.e. C:\Intellisoft\MMWIN\EXPORT\REPORT.PDF) where the file should be located once created.
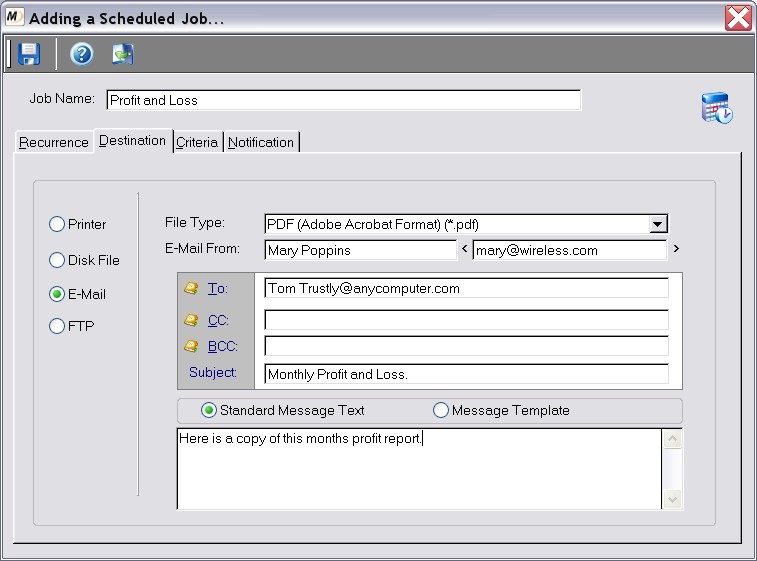
Figure 15-2. Scheduled Job screen.
E-Mail Options
File Type
Choose the output file type that this process should be created in. Choose from CSV (Comma Delimited), PDF (Portable Document Format), or Text (Tab Delimited).
E-Mail From
Enter the name of the person sending this e-mail in the first box. This name will appear in the "From:" box on the e-mail that will be sent out by ManageMore after this job is completed. Then enter the e-mail address that will appear in the "From:" box on this e-mail as well in the box that is surrounded by the pointed brackets (< >).
To:
Enter the e-mail address(es) of the people who are to receive this e-mail. Click on the To: button itself to choose e-mail addresses from a list.
CC:
Enter the e-mail address(es) of the people who are to receive a copy of this e-mail but are not the primary recipients of the e-mail. Click on the CC: button itself to choose e-mail addresses from a list.
BCC:
Enter the e-mail address(es) of the people who are to receive a copy of this e-mail but whose e-mail addresses are not to appear in the e-mail address at all. Click on the BCC: button to choose e-mail addresses from a list.
Subject
Enter the subject that this e-mail should be sent out with. This subject will appear on the e-mail the recipients get.
Standard Message Text
Choose this option if you wish to type your own e-mail message text in for this e-mail which will be sent along with the file being created by this job.
Message Template
Choose this if you have an e-mail message template already created that you want to use with this job. Enter or select the template ID in the box provided if you choose this option.
FTP Options
FTP Profile
Choose the FTP Profile that will describe what FTP Server the job will be sent to.
File Type
Select the type of file to be transferred. Choose from PDF, CSV (comma-separated value), or TXT (Tab-delimited text).
File Name
Enter or select the name of the file to be transferred.
Criteria
This tab will show all of the parameters (criteria) that are going to be used in the processing of the job.
Notification
Notify the following employee(s) if an error event occurs:
Instructs the program on whom to contact should a problem occur when running the job. The program will alert the employee(s) chosen by showing a message box the next time the employee(s) log in. You can choose from the following:
| No One | There will be no warning message delivered.
|
|
|
| All Employees | Every employee in the employee list will receive notification.
|
|
|
| Specific Employee | The program will alert the employee whose ID has been entered or selected in the box following.
|
|
|
When checked, the program will e-mail the employee(s) selected that a problem has occurred with the job. E-Mail will be sent immediately upon a problem occurring with the job.
Alert text for notification message:
Enter the message you want the employees to see when a problem occurs with running this job.
Reset Alert Text
Click this button to reset the text in the above box to the default message.
Scheduled Jobs List
This list will show you all of the scheduled jobs that have been created in the program. From this list, the user can find out what jobs are running, what jobs have stopped, and what jobs are ready to run at their specified time. The user can also manually modify the parameters of the job from this list here as well.
Field by Field Help - Scheduled Jobs List
Enable Job
Click this button to start this job again. Use this button if you have stopped this job and want it to continue from this point.
Disable Job
Click this button to stop this job from running.
Run Highlighted Job Immediately
Click this button to start the process that is highlighted right away instead of waiting for it to run at its defined time.
View the Job Log for the highlighted job
Click this button to see what has happened each time this job has run. You will be able to see the Event Type, Job ID, and Message Text as well as any messages that were sent as a result of running this job.
Status
Shows the status of the job. This will either show a green arrow for a job that is ready to run, a red square to denote a job that is stopped or finished running, and an icon of a running man to show the job is currently running.
Job Name
Displays the name that the job was given when it was originally scheduled.
Next Run Date
Displays the date on which this process will run again.
Next Run Time
Displays the time of day that this job will run again.
Created By
Displays the initials of the employee who scheduled this job.
Q & A - Job Scheduler
Q01. How are the jobs that I schedule executed?
A01. The jobs that are scheduled are executed by the Job Scheduler Sentinel Engine. You can install this program by running the installation program that is contained in your program path (SetSched.exe). During the installation of Job Scheduler, you will be prompted to install Scheduler in one of two modes: Windows Service Mode or System Tray Applet Mode. Each mode has its advantages and disadvantages, and this is discussed during the installation process.
Q02. Do I install the Job Scheduler Sentinel Engine on all my computers?
A02. No. You should only install the Job Scheduler Sentinel Engine on ONE computer on your network. This computer will handle any job that is scheduled in ManageMore.
Q03. Are there any special considerations when deciding on which computer will host the Job Scheduler Sentinel Engine?
A03. You should first make sure that any applicable settings contained in the README.TXT document have been applied on this computer. You should also ensure that this computer has a means by which to access the internet if you will be scheduling e-mail and FTP jobs. Lastly, you should ensure that any printers that users may wish to print scheduled reports to are defined on the host computer with EXACTLY the same name as they are on the users' computers.
Q04. I don't see my question here. Where else can I get information?
A04. Visit our website's Technical Support section.