Menu Navigation
Activities ... Use Organizer
About the Organizer
ManageMore's Organizer screen brings the capability of a fully functional e-mail client and task management system into your business software. With this one powerful screen, each employee can stay organized and on top of their messages and tasks, while never leaving ManageMore. In addition, the software's groupware features allow common items to be shared among several employees, so that an evenly distributed workload can be accomplished.
In this Topic
Quick Help - Organizer
Organizing E-Mail
Organizing Tasks
Q & A - Organizer
Related Topics
3.16 Organizer Options
4.4 Customer Care
4.8 Task Management
4.10 E-Mail
Quick Help - Organizer
| 1) | Select the Organizer menu option.
|
| 2) | Select the View to change functional views (e.g. E-Mail, Tasks, etc.).
|
| 3) | Use the lists, tabs and buttons to add New, Edit, View, Send, and Receive items.
|
Organizing E-Mail
Mail Folders List
This list contains the folders in which your individual e-mail messages are kept. ManageMore will automatically start with five built-in folders:
| Inbox | Stores your recently received, unread mail.
|
|
|
| Outbox | Temporarily stores messages waiting to be sent.
|
|
|
| Sent Items | Stores the messages that have already been successfully sent, if the option to save messages is chosen.
|
|
|
| Deleted | Temporarily stores messages to delete -- similar to the Recycle Bin in Windows.
|
|
|
| Drafts | Stores messages that are waiting to be sent. Messages in this folder can be opened later and edited before sending.
|
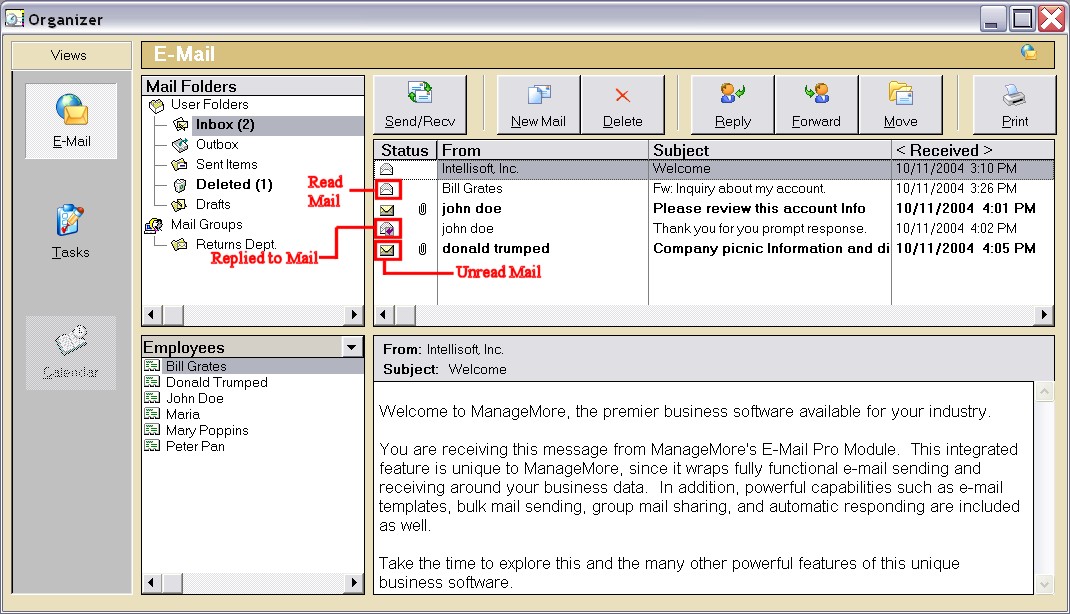
Figure 4-5. Organizer screen
Address Book List
Below the Mail Folders window is a listing of the e-mail recipients in your address book. You may have options to view Customers/Prospects, Employees, Departments, and Personal, depending upon your e-mail settings. Double click on a name to send a message to that recipient.
Message List
When a folder is chosen, the window on the upper-right will display a list of e-mail messages in that folder. You may <double-click> on the list headers to sort the list of e-mails by that column (e.g. From, Subject, Received). Sorting occurs from first to last (i.e. A-Z, 0-9).
Message Preview
Under the list of e-mail messages, you will find a preview box that will show you the first few lines of the highlighted e-mail message. You will also see the To:, From:, and Subject information. There will also be a button on the right to view/open/save attachments if the e-mail message contains any.
Buttons
Go To
Click this button to open the highlighted folder. This button is only available in the "User Folders" or "Mail Groups" view.
Purge
Click this button to purge messages from the highlighted folder. You may choose to purge all messages or only old (read) messages. This button is only available in the "User Folders" or "Mail Groups" view.
New Folder
Click this button to create a new folder in your list of user folders. This button is only available in the "User Folders" view.
Refresh
Click this button to recalculate the number of new email messages as well as the total number of messages in each folder.
Send/Recv
Click this button to send any outgoing mail and receive any incoming mail.
New Mail
Click this button to create a new e-mail message.
Delete
Click this button to delete the highlighted e-mail message.
Reply
Click this button to create a reply message to the highlighted e-mail message.
Forward
Click this button to forward the highlighted message to another e-mail recipient.
Move
Click this button to move the highlighted e-mail message to another folder.
Click this button to print the highlighted e-mail message.
| You may also right click on any message and utilize any of the functions above. You may also use drag-and-drop methods to move messages around between folders, as well as using Ctrl+Click to highlight multiple messages for dragging to the same folder.
|
Organizing Tasks
Department
Enter or select the code for the department whose tasks you want to view.
Employee
Enter or select the employee ID of the employee whose tasks you want to view.
Show
Select which tasks you wish to view in this window.
| All | Show all tasks assigned to the selected employee
|
|
|
| Incomplete | Show incomplete tasks assigned to the selected employee.
|
|
|
| Single Day | Show tasks for the selected employee which are due on the date selected.
|
|
|
| Entered By | Show tasks which were entered by the selected employee.
|
Show tasks starting on or before
Enter the date such that you want to see any tasks beginning on or prior to this date. You may also change this date by selecting a date on the calendar provided.
Buttons
New
Click this button to create a new task.
Edit
Click this button to modify the highlighted task.
Delete
Click this button to delete the highlighted task.
Click this button to print out a task list (report showing a listing of the tasks based on the other criteria on the page), task sheets (one page per task highlighting all information pertaining to that task), or single task (print out of the highlighted task).
Close
Click this button to close the Organizer and return to the previous window.
Customer Care
If a task is selected which relates to a specific customer or prospect, a button will be enabled above the Customer Information fields which will allow access to Customer Care. Click this button and the Customer Care screen will be activated for the particular customer/prospect.
Q & A - Organizer
| Q01. | How do I create Mail Groups so that messages can be shared by employees?
|
| A01. | On the e-mail address setup screen, choose the option that E-Mail messages sent to this address are shared by multiple employees. This will create a Mail Group for the address. This address can be assigned to multiple employees, each of which will belong to the Mail Group created.
|
| Q02. | How do I activate e-mail for a particular employee/user?
|
| A02. | On the Employee screen, choose the E-Mail tab. Check the option for receiving internal mail, and/or the options for sending mail to customers, prospects, employees and vendors. Click the e-mail accounts button to assign addresses to send and receive external e-mail.
|
|
|
| Q03. | How can I restrict an employee to view only one department's tasks?
|
| A03. | In the Security Administrator, lock the department filter, but not the employee filter. The user will be able to change the employee to view, but only within the user's department.
|
|
|
| Q04. | How can I delete more than one message at a time?
|
| A04. | Select User Folders, and click the Purge button to remove messages from a desired folder. This will permanently delete the messages.
|
|
|
| Q05. | I am highlighted on a group e-mail message, but it does not get marked as read. Why not?
|
| A05. | Group messages must be specifically opened, or marked as read by <right clicking> the message and choosing the Mark as Read option. This option can be locked with the Security Administrator so that only a supervisor can mark messages once complete. The initials of the user who opened or responded to the e-mail will be saved in the e-mail list.
|
|
|
| Q06. | I don't see my question here. Where else can I get information?
|
| A06. | Visit our website's Technical Support section.
|
|
|