Menu Navigation
Lists ... Accounts Payable ... Purchase Receipts
Activities ... Accounts Payable ... New Purchase Receipts
About Purchase Receipts and Credits
Purchase Receipts are used to record the actual receipt of goods and services from your vendors. Sometimes referred to as debit memos or bills, these receipts can be restricted to approved purchase orders if desired (see Setup Accounting, Purchasing section). Purchase Receipts can be entered for purchases of inventory items, or general ledger accounts (e.g. expenses). For returns or mistakes, credits can be entered to reverse the receipt transactions. Purchase Receipts are paid by creating Disbursement transactions, which can be done for all vendors at once, with the Pay Bills feature.
In this Topic
Field by Field Help - Purchase Receipt screen
Purchase Credits
Accounting For Purchases
Q & A - Purchase Receipts
Related Topics
2.7 How to Use Lists
2.10 How to Use Activities
3.6 Setup Accounting
3.9 Setup Forms
8.1 Vendors
8.2 Purchase Orders
8.6 Disbursements
8.7 Paying Bills
9.1 Supertrack Inventory
12.1 Chart of Accounts
Field by Field Help - Purchase Receipt screen
Buttons
Save
Click this button or press <Enter> to complete the transaction.
Insert Item
Click this button to insert a new line item into the transaction.
Delete Item
Click this button to delete the currently selected detail item.
Search for Item
Click this button to search supertrack inventory or chart of accounts for an item to be placed on this transaction. This action is dependent upon the Use GL Accounts field.
Item Profile
Click this button to view the selected item's supertrack inventory record. You can then view and/or make changes to the record from the window that comes up. Note that any changes you do make will not immediately affect the line item in the transaction you are currently creating unless you delete and re-add the item.
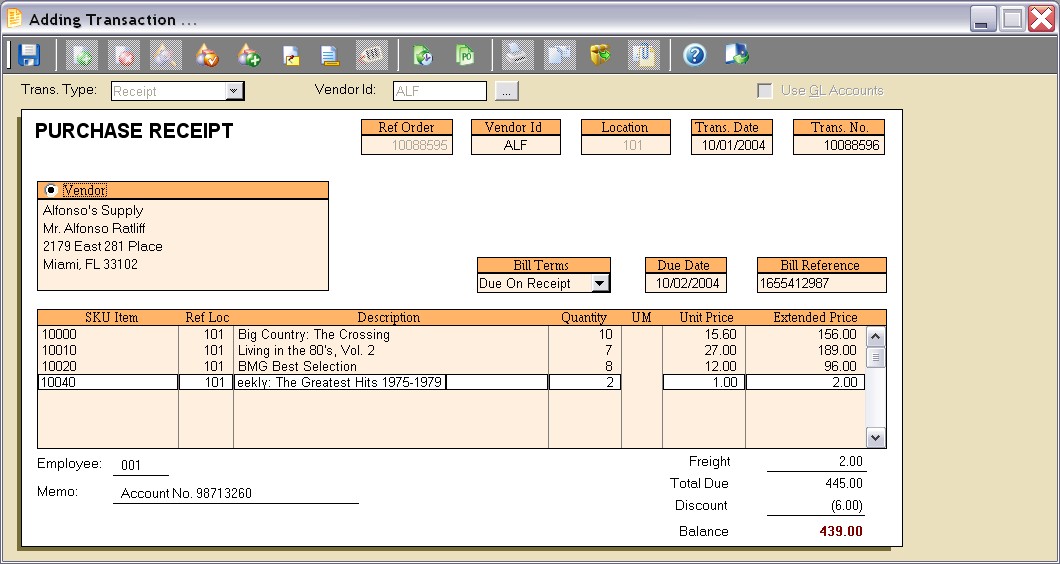
Figure 8-3. Purchase Receipt screen
Create Item
Click on this button to create a new supertrack inventory item. An item can be created on the fly by simply using a template and filling in a SKU item number and cost, or by completing a supertrack inventory item record. Either option will insert the new SKU item into the transaction, when finished.
Item Notes
Click this button to view/edit the transaction item note for the currently selected detail item. This note will be printed on the transaction following the item.
Transaction Notes
Click this button to view/edit a large note to be printed in bold at the bottom of the printed transaction.
Serial/Lot Numbers
Click this button to view, add, or remove serial numbers for the currently selected detail item. This button will be displayed only when an item is selected which has been activated to allow serial number use.
Fill from Previous Transaction
Click this button to have the program fill items from the previous purchase receipt for this vendor. Click again to fill from the purchase prior to that, and so on. This is useful if an already existing purchase receipt is similar or identical to the new receipt you want to create. A vendor ID must be chosen prior to using this feature.
Open POs
Click this button to display a list of open purchase orders that can be used to create this purchase receipt. This button requires the vendor ID to be filled in first.
Click this button to reprint a previously completed transaction. This button will be disabled when creating a new transaction. However, an option to print the transaction will be given upon completing the new transaction.
Click this button to e-mail a previously completed transaction. This button will be disabled when creating a new transaction. However, an option to e-mail the transaction will be given upon completing the new transaction.
Memorize/Recall Transaction
Click this button to memorize the existing transaction (edit mode) or recall a memorized transaction (new entry mode).
Attach documents to this record
Click this button to view or attach documents to this record in the Intellifile Explorer.
Header Fields
Trans. Type
Select the type of transaction to be created. Choose from purchase receipt or purchase credit. This field will be disabled in edit mode, or if a specific type was selected from the main menu.
Vendor ID
Enter the identifier for the vendor to which this transaction relates. This field is required to complete the transaction.
Ref Open PO
Enter the purchase order number that this purchase receipt should reference. This value may be required, depending upon the option selected in the Purchases category of Setup ... Accounting.
Location
Displays the location of the transaction. This value cannot be changed.
Trans. Date
Displays the transaction date. This value cannot be changed.
Trans. No.
Displays the sequential, internally-generated number that is assigned to this transaction. This value cannot be changed.
Vendor
Displays the vendor's address. This address can be edited by clicking the radio button provided.
Use GL Accounts
When checked, instructs the program to use GL accounts instead of inventory items in the purchase receipt. This option is useful for purchasing expenses such as rent or utilities.
Bill Terms
Select the terms that apply to the payment of this purchase receipt.
Due Date
The date upon which this transaction should be paid for by your company. This value will be computed based on the terms selected, and may be overridden.
Bill Reference
Enter the vendor's invoice number or reference here. This value is used to identify the transaction when paying bills or making disbursements. This value will print on the check stub for vendor reference.
Detail Fields
SKU Item/GL Account
Enter the identifying code of the item being purchased. A barcode reader may optionally be used to enter this field.
Ref Loc
Enter the location in which this item or GL account should effect. This will only be available on a line item that is considered an expense or on a GL account.
Description
Displays the description of the SKU Item/GL Account chosen.
Quantity
Enter the number of units of the SKU Item chosen. The number of decimal places displayed in this field is determined by the quantity precision setting in the Inventory section of Setup ... Accounting.
UM
Displays the unit of measure used when purchasing this item. Quantities ordered will reflect this unit of measure. This field is not applicable to GL accounts.
Unit Price
Enter the cost per unit for this item. The number of decimal places displayed in this field is determined by the cost precision setting in the Inventory section of Setup ... Accounting.
Extended Price
The unit price multiplied by the quantity. Changing this field will recompute the Unit Price.
Footer Fields
Employee
Displays the employee ID of the employee creating the transaction. This value cannot be changed.
Memo
Enter a reference note about the transaction here. This value will not print on the document.
| You may want to include a policy or other message on the bottom of every document. A standard policy message which will print on the document can be set for each transaction type in Setup ... Forms.
|
Freight
Enter the amount for freight charges assessed by the vendor. This value may be edited after saving a new transaction in case freight amounts were estimated or not initially provided by your vendor.
Total Due
The gross total of the transaction, computed by the program to equal the sum of all detail items' extended price, plus freight.
Discount
Enter any discount here. The value will display as a negative value. This value may be edited after saving a new transaction. This value may be automatically computed by the program, based on the terms selected, when paying bills or creating disbursements.
Balance Due
The final total of the transaction, computed by the program to equal the total due minus any discount. This value will also reflect any payments made against this transaction.
Purchase Credits
Purchase Credits are made to reverse the effects of a purchase receipt. These transactions will remove items from your inventory that are already present as well as request a disposition for the items returned to a vendor. Optionally, the original purchase order to purchase the items can be reinstated, if desired.
Purchase Credits may be entered by selecting an existing purchase receipt from a list and pressing <delete> or clicking the Delete button. This will automatically select the highlighted receipt for reversal. Alternatively, the user may select the Purchase Credit option from the main menu, or select the purchase credit transaction type from the purchase receipt screen to begin with a blank purchase credit.
Additional Purchase Credit Fields
Ref Transaction No.
Enter the transaction to be reversed. This value will be disabled once completed.
Reason Code
Enter an optional code to represent the reason for this return. This value is used for internal tracking purposes and will not print on the document.
RMA Reference
Enter the Return Merchandise Authorization reference provided by the vendor, if any. This value will print on the document.
Quantity
Enter the quantity to be returned or reversed. This value may be optionally prefilled from the original transaction.
Accounting For Purchases
Item purchases
|
|
Dr
|
Cr
|
|
Inventory/Expense GL Account
(From Supertrack Inventory) |
XXXX
|
|
|
|
|
|
|
Accounts Payable GL Account
(From Setup Accounting) |
|
XXXX
|
GL Account purchases
|
|
Dr
|
Cr
|
|
GL Account
(From transaction) |
XXXX
|
|
|
|
|
|
|
Accounts Payable GL Account
(From Setup Accounting) |
|
XXXX
|
Purchase Credits reverse the above entries.
Q & A - Purchase Receipts
Q01. What should I do if I have already ordered items from my vendors, and have paid with a credit card, but do not want to show that I have received inventory yet?
A01. Make a purchase credit and select the Use GL Accounts option. Then select the GL Account of your credit card and type in the amount you have paid to that vendor. Then you ahve the credit on your account with that vendor in ManageMore. Once the items arrive, you can create a purchase receipt for it, then when creating the disbursement, select both the receipt and credit, and they should zero each other out.
Q02. I don't see my question here. Where else can I get information?
A02. Visit our website's Technical Support section.