Menu Navigation
Setup ... POS/Hardware
About POS/Hardware Setup
Use this screen to set up important options used for point of sale equipment, electronic payment processing settings, and biometric device options. The Setup POS/Hardware screen has been divided into several categories, each containing important settings. Select the category on the left side of the screen, and the settings for that category will appear on the right.
Keep in mind that not all sections may apply to your business. In addition, some sections in the POS/Hardware setup list may be hidden based on the features included with your license.
In this Topic
Field by Field Help - Setup POS screen
Barcode Scanner
Biometric Security
Card Reader
Cash Drawer
| Payment Authorization
|
Pole Display
Receipt Printer
Signature Capture
Related Topics
3.7 Setup Company
3.8 Setup Options
3.9 Setup Forms
5.1 Invoices and Refunds
16.5 Credit Card Processing
Field by Field Help - Setup POS screen
Buttons
Memorize Station Settings
Click this button to save this station's settings for later recall on any networked PC. Memorized Station Settings make it convenient to quickly set up multiple workstations with the same or similar configuration. After clicking the button, you will be prompted to give a name to this station's settings.
Recall Station Settings
Click this button to recall the station settings list. You can then choose from the station settings list, or delete any station setting that exists in the list. Once applied, station settings can still be edited.
Barcode Scanner
Workstation Setup
Barcode Scanner device is connected to this station
Check this box to allow ManageMore to operate with a barcode scanner on this PC only. This checkbox must be checked for the next field on this tab to be active.
Barcode Scanner Model
Select the model of barcode scanner that is attached to this PC. If your model is not listed, choose Generic (Keyboard/USB Interface).
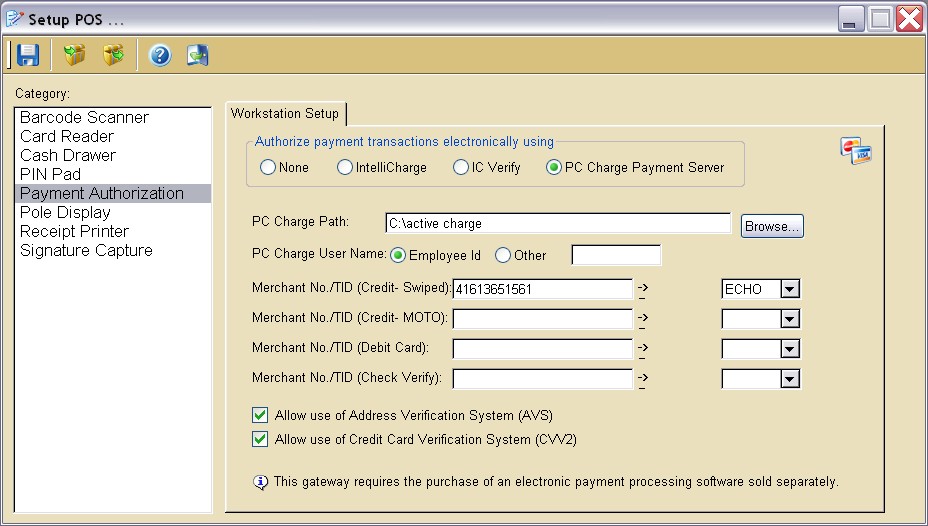
Figure 3-3. Setup POS screen
Biometric Security
Workstation Setup
Biometric device is connected to this station
Check this box if you have connected a biometric device to this workstation. This option must be checked for the remainder of the fields on this page to be available.
Biometric Model
Select the type of biometric device attached to this workstation. Choose from Fingerprint Model or Other.
Use biometric device on all security logins
Check this box to replace the standard method of user names and passwords with a biometric scan on all security logins to ManageMore and Security Administrator.
| It is imperative that you enroll at least one set of employee's fingerprints prior to activating the previous option. Failure to do so will likely result in all users being locked out of the software.
|
Use biometric device with time clock
Check this box to utilize the biometric device with the timeclock instead of user IDs and/or passwords.
Card Reader
Workstation Setup
Magnetic Stripe Card Reader device is connected to this station
Check this box to allow ManageMore to operate with a magnetic stripe card reader on this PC only. This checkbox must be checked for the next field on this tab to be active.
Card Reader Model
Select the model of card reader that is attached to this PC. If your model is not listed, choose Generic (Keyboard/USB Interface).
Cash Drawer
Workstation Setup
Cash drawer device is connected to this station
Check this box to allow ManageMore to operate with a cash drawer device on this PC only. This checkbox must be checked for the remaining fields on this tab to be active.
Cash Drawer Model
Select the cash drawer model that is attached to this PC. If your model is not listed, choose Generic (Printer Driven).
Cash Drawer Port
Select the port that the cash drawer device is connected to. Choose from Printer, COM1, or COM2.
Baud Rate, Parity, Data Bits and Stop Bits
The communication settings for the pole display. These are defaulted to 9600, None, 8, and 1, respectively.
Cash Drawer Signal
Enter the ASCII character numbers needed to open the drawer as specified by your cash drawer manufacturer. Note: Most cash drawers default to 07 for electronically opening the drawer.
Connected Printer
Enter or select the printer that this cash drawer is connected to, if applicable.
Payment Authorization
These settings are used for one-time credit card and "check by phone" transactions in ManageMore. In addition, you must complete settings in this section to use the online providers for funds transfer during billing/statements.
All settings must be completed on each workstation that will use payment authorization.
| · | To allow funds transfer during billing/statements, see the EFT section in Setup ... Options.
|
| · | For an overview of credit card processing, see the topic in the Advanced Features chapter.
|
| Payment Authorization functionality requires sign-up with an authorized merchant services provider. Please contact Intellisoft Sales Department, or visit our website at https://www.managemore.com/intellicharge/ Some of the providers require additional software not included with ManageMore.
|
Workstation Setup
Authorize payment transactions electronically using
Select the method that you wish to use for verification of electronic payments.
| None | No electronic payment authorization is used in ManageMore.
|
|
|
| IntelliCharge | This online system requires sign up with IntelliCharge, and installation of a driver on each workstation (see below). Supports all major credit cards and electronic checks. Supports address verification and CVV2 fraud protection. Supports EFT processing during billing (AUTHORIZENET gateway only).
|
|
|
| ICVerify | This online method requires additional software sold separately. This software is widely distributed via independent dealers. Supports credit card processing only. Supports EFT processing during billing. This method, however, is no longer supported.
|
|
|
| PC Charge | This online method requires additional software sold separately. Supports credit card processing and electronic checks. Supports address verification. Please contact Intellisoft sales for licensing of this product.
|
IntelliCharge Settings
Install Driver
Click this button to install the required IntelliCharge driver on this workstation.
Gateway
The IntelliCharge credit card processing software is included free with your ManageMore license, based on activating with our preferred Merchant Account Provider partners and utilizing Authorize.Net, one of the largest internet-based credit card gateway providers. You can also use the popular Verisign Payflow Pro gateway.
Merchant Login Id
Enter the merchant login supplied by the Merchant Account Provider.
Merchant Login Id 2
Enter the secondary merchant login supplied by the Merchant Account Provider. This value is used on certain gateways for processing refunds/credits.
Merchant Password
Enter the password for merchant login.
Allow use of Address Verification System (AVS)
This feature allows ManageMore to confirm the credit card transaction's validity by sending address information to the credit card processor along with the credit card information. The transaction can be denied if the address information does not match the credit card system.
Allow use of Credit Card Verification System (CVV2)
Another fraud protection, this system automatically verifies actual credit card presence by confirming extra information stored/printed on the card.
Allow use of electronic check payment feature
Select whether you wish to process electronic check payments (also called "checks by phone"). This feature works with the customer payments screen to enable the user to enter a customer's bank account and routing number to automatically transfer money from their account. This feature also works with statement processing, for customers with bank account information setup on the account.
Use test mode during implementation stage
You can select this option to test your connection to the IntelliCharge system. No transactions will be processed, however a sample authorization response will be provided by the system.
Use a proxy server
If this workstation connects to the internet via proxy server, select this option. You will then be required to complete the proxy server settings.
Address
The IP address of the proxy server.
Port
The port through which to pass IntelliCharge normal (HTTP) traffic.
Proxy SSL
The port to use for Secure Socket Layer traffic.
ICVerify Settings
Transaction Path
The transaction path is the folder where data shared between ManageMore and ICVerify is stored. This folder is referred to by ICVerify as the "Request Directory". It is recommended that you select a folder within the program folder of ManageMore (MMWIN) as your transaction path and that you create a folder should one not already exist.
This Workstation No.
In IC Verify, you must assign a unique number to each workstation that will be processing electronic payment transactions. Enter that number in this field in ManageMore. This ensures that an approval code is directed to the correct workstation.
PC Charge Settings
PC Charge Path
The transaction path is the folder where data shared between ManageMore and PC Charge is stored. This folder must be the same as the program path for the PC Charge software.
PC Charge User Name
Select whether to use the currently logged in employee ID from ManageMore or another user defined name. Regardless of the user name used, the exact same name must exist in the users list in PC Charge.
Merchant No./TID
Enter the merchant identifier (12 digits in length) supplied by the payment processor, immediately followed by the TID number (6 digits in length). There should not be any characters or spaces between the Merchant and TID numbers.
Processing Company
Select the appropriate code for the credit card processing company for which you signed up.
Allow use of Address Verification System (AVS)
This feature allows ManageMore to confirm the credit card transaction's validity by sending address information to the credit card processor along with the credit card information. The transaction will be denied if the address information does not match the credit card system.
Allow use of electronic check payment feature
Select whether you wish to process electronic check payments (also called "checks by phone"). This feature works with the customer payments screen to enable the user to enter a customer's bank account and routing number to automatically transfer money from their account. This feature also works with statement processing, for customers with bank account information setup on the account.
PIN Pad
Workstation Setup
PIN Pad device is connected to this station
Check this box to allow ManageMore to operate an attached PIN pad on this PC only. This checkbox must be checked for the remaining fields on this tab to be active.
PIN Pad Model
Select the PIN Pad model that is attached to this machine. Choose from HHP TT-3100/TT-3101, Veriphone PINPad 1000/1000se, or Veriphone PINPad 2000.
Selecting the HHP TT-3100/TT-3101 model above will show the following fields:
Display image file on pad during transaction intermission
Check this box to show a particular image on the PIN pad while the transaction is being created.
Image File
Enter the full path and filename (e.g. C:\MMWIN\DATA1\IMAGE.BMP) of the image to show when the above checkbox is selected. Use the Browse and Load buttons to find through Windows Explorer.
Selecting the Veriphone PINPad 1000/1000se or the Veriphone PINPad 2000 will show the following fields:
PIN Port
Choose the COM port that the PIN Pad is connected to.
Baud Rate
Select the baud rate to use as defined by the manufacturer of the PIN Pad.
Parity
Select the parity setting to use as defined by the manufacturer of the PIN Pad.
Data Bits
Select the number of data bits to use to use as defined by the manufacturer of the PIN Pad.
Stop Bits
Select the number of stop bits to use as defined by the manufacturer of the PIN Pad.
Time Out
Select the number of seconds that should elapse before the PIN Pad times out (reverts back to its idle state).
Selecting the HHP TT-3100/TT-3101 or the Veriphone PINPad 2000 will also cause the following field to become available:
Allow credit/debit card reader use on this device
Check this box to allow the swipe reader on the PIN Pad to be used by the customer.
Translation
Language used for Standard Prompts
Select the language that prompts on the PIN Pad should be displayed in. Select from English or Spanish.
Welcome Message
Enter the message you want to appear on the PIN Pad at the beginning of each transaction.
Cash Back
Allow cash back during debit transactions on this workstation
Check this box to allow cash back to be used when a debit card is chosen for payment on this PC. Selecting this box also allows for the following fields to be usable.
Valid Amount 1-4
Enter an amount of cash back you would like to offer the customer when they use a debit card during a transaction.
Pole Display
Workstation Setup
Pole display device is connected to this station
Check this box to allow ManageMore to operate with a pole display device on this PC only. This checkbox must be checked for the remaining fields on this tab to be active.
Port
The serial port to which this workstation connects the pole display.
Baud Rate, Parity, Data Bits and Stop Bits
The communication settings for the pole display.
Clear All Code
Enter the ASCII code for clearing the entire display as provided by your pole display manufacturer.
Scroll Code
Enter the ASCII code for scrolling text as provided by your pole display manufacturer.
Cursor On/Off Code
Enter the ASCII code for turning on or turning off the cursor as provided by your pole display manufacturer.
Message Scroll
The message to appear between transaction entries.
Translation
Taxes Due Message
The prompt to appear before tax amount. Appears when transaction is completed.
Total Due Message
The prompt to appear before total due amount. Appears when transaction is completed.
Tendered Message
The prompt to appear before amount tendered. Appears after transaction tender is completed.
Change Due Message
The prompt to appear before change amount. Appears after transaction tender is completed.
Receipt Printer
Workstation Setup
Receipt Printer device is connected to this station
Check this box to allow ManageMore to operate with a receipt printer on this PC only. This checkbox must be checked for the remaining fields on this tab to be active.
Printer Model
Select the receipt printer model that is attached to this PC. If your model is not listed, choose Generic.
Extra Linefeeds at End
Select the number of carriage returns that will be added to the end of the receipt for easier tearing of the receipt.
Start Command
Enter the manufacturer's command for starting a receipt printout. Commands are denoted by numeric ASCII codes separated by commas. To separate two or more commands on the same line, use a vertical bar between the commands ( | ).
End Command
Enter the manufacturer's command for ending a receipt printout. Commands are denoted by numeric ASCII codes separated by commas. To separate two or more commands on the same line, use a vertical bar between the commands ( | ).
Paper Cut Command
Enter the manufacturer's command for automatically cutting a receipt printout. Commands are denoted by numeric ASCII codes separated by commas. To separate two or more commands on the same line, use a vertical bar between the commands ( | ).
Bar Code Command
Enter the manufacturer's command for automatically adding a barcode to the end of a receipt printout. Commands are denoted by numeric ASCII codes separated by commas. To separate two or more commands on the same line, use a vertical bar between the commands ( | ).
Bold Print On Command
Enter the manufacturer's command for turning on the bold type in a receipt printout. Commands are denoted by numeric ASCII codes separated by commas. To separate two or more commands on the same line, use a vertical bar between the commands ( | ).
Bold Print Off Command
Enter the manufacturer's command for turning off the bold type in a receipt printout. Commands are denoted by numeric ASCII codes separated by commas. To separate two or more commands on the same line, use a vertical bar between the commands ( | ).
Translation
Subtotal Message
Enter the message you want to have appear before the subtotal amount on your receipt printout.
Freight Message
Enter the message you want to have appear before the freight amount on your receipt printout.
Discount Message
Enter the message you want to have appear before the discount amount on your receipt printout.
Total Due Message
Enter the message you want to have appear before the total due amount on your receipt printout.
Balance Due Message
Enter the message you want to have appear before the balance due amount on your receipt printout.
Tendered Message
Enter the message you want to have appear before the amount tendered on your receipt printout.
Change Due Message
Enter the message you want to have appear before the change due amount on your receipt printout.
Header/Footer Msg
Header Message Line(s)
Enter up to three lines of text that will appear at the top of each of your receipts.
Footer Message Line(s)
Enter up to five lines of text that will appear at the bottom of each of your receipts.
Credit Card Msg
Credit Card Message Line(s)
Enter up to ten lines of text that will appear on each receipt where a credit card was tendered.
Extra
Include company name on receipt
Check this box to have your company name appear on each receipt.
Include company address on receipt
Check this box to have your company address appear on each receipt.
Include detail header on receipt
Check this box to have the detail header appear on each receipt.
Include customer account number on receipt
Check this box to have your customer's account number appear on each receipt.
Include customer name on receipt
Check this box to have your customer's name appear on each receipt.
Include SKU item on detail line of receipt
Check this box to have the SKU item information appear on each receipt.
Include extended information on detail line of receipt
Check this box to include the secondary description field on 40 column printer receipts, or to include the primary description line on 20 column printer receipts. These additional descriptions will appear on the next line following the appropriate line item.
Include bar coded transaction number on receipt
Check this box to have the transaction number appear on each receipt in barcode format.
Signature Capture
Workstation Setup
Signature capture device is connected to this station
Check this box to allow ManageMore to operate with a signature capture device on this PC only. This checkbox must be checked for the remaining fields on this tab to be active.
Signature Capture Model
Select the model of signature capture device attached to this workstation.
Display image file on pad during transaction intermission
Check this box to show a particular image on the PIN pad while the transaction is being created.
Image File
Enter the full path and filename (e.g. C:\MMWIN\DATA1\IMAGE.BMP) of the image to show when the above checkbox is selected. Use the Browse and Load buttons to find through Windows Explorer.
Allow credit card reader use on this signature capture device
Check this box to allow the swipe reader on the signature capture device to be used by the customer.
Translation
Confirmation Message Line 1-3
Enter the text to display on the signature capture device when the device is prompting for a customer signature.