Menu Navigation
Activities ... Billing ... Generate Statements
Activities ... Billing ... Distribute Statements
Lists ... Billing ... Statement History
About Statements
Statement Processing starts the actual billing process in ManageMore. The Statement process serves two main functions: to charge customers for recurring charges, and to recap incidental charges during a period. The statement process consists of three main steps: generation, posting, and distribution. Methods of statement distribution include many professional laser-based printed forms, pre printed mailers, postcards, e-mail and electronic funds transfer. You can even send the bills to a file for an outside service to print and mail on your behalf.
In this Topic
Quick Help - Statements
Generating Statements
Field by Field Help - Generate Statement Criteria screen
Posting Statements
Field by Field Help - Post Statements screen
Distributing Statements
Field by Field Help - Distribute Statements screen
Q & A - Statements
Related Topics
2.10 How to Use Activities
3.8 Setup Options
3.9 Setup Forms
7.2 Recurring Charge Items
7.5 Services
7.9 Collections
7.8 Finance Charges
Quick Help - Statements
1) Select the Generate Statements menu option.
2) Click the Build List button to select statement criteria.
3) Verify the new statement/recurring charges to be generated.
4) Click the Post button to post statements.
5) Select the Distribute Statements menu option.
6) Select the Distribute button to select distribution criteria.
Generating Statements
The first step in the statement process is to generate statements. The generate statements process examines customers for a selected billing group, and determines the need for recurring charges to be generated, and for transactions to be posted and included on the statement.
| If no recurring charges are found, no posting option will be given. Therefore, if your company normally has no recurring charges to generate, select the option for automatic posting provided on this screen.
|
Field by Field Help - Generate Statement Criteria screen
Begin Building List
Click on this button to begin building the list with the criteria entered
Billing Group
Enter or select the billing group from which customers will be selected.
Billing Period
Displays the billing period for which charges will be generated.
Bill Due By
Enter or select the date upon which the statements and new recurring charges generated will be due. This value cannot be changed once the list has been created and posted.
Post immediately after this Statement Criteria is completed
When checked, automatically posts the invoices created from the billing process and any other unposted invoices, as well as creating the distribution file needed to print the statements without any further prompting.
Use SuperSpeed Posting for Very Large Databases
When checked, speeds up the posting process by using more memory and system/network resources. This option is recommended for larger databases and/or during times of light system usage.
Posting Statements
The second step in the statement process is to post statements. The posting process will create transactions for each of the recurring charge records created in the generation stage. All unposted, outstanding invoices to be included on the statement are posted in this stage as well.
| Like most other posting processes, statement posting is irreversible. In the event of power failure or computer lockup during posting, re-attempt the posting process again to finish the process.
|
Field by Field Help - Post Statements screen
Begin posting list
Click on this button to begin posting the list in its current form.
Billing Group
Displays the billing group related to this posting. A description of the billing group is found directly beneath the number.
New Entries to Post
Displays the number of new invoices for recurring charges that will be generated. This may not equal to the number of statements, which is determined by the number of customers who have unposted transactions for this time period.
Due Date
Displays the due date that was entered in the generation step. If this date is incorrect, you will need to cancel the posting, empty the generate statements list, and repeat the generation step.
Distribution File
Displays the name of the distribution file that will be created from posting the statements. This value cannot be changed.
Billing Period
Displays the period of service that is being billed. This value cannot be changed from this window.
Comment
Enter a comment that will be displayed on the Distribute Statements screen. This value is for internal reference only, and will not appear on the statement documents.
| You may want to include a collection policy or other message on the bottom of every document. A dunning message which will print on the document (for each class code and aging category) can be set in Setup ... Forms.
|
Use SuperSpeed Posting for Very Large Databases
When checked, speeds up the posting process by using more memory and system/network resources. This option is recommended for larger databases and/or during times of light system usage.
Distributing Statements
The final step in the statement process is statement distribution. Distributing statements can involve printing them, e-mailing them, sending them to an EFT process, or creating a file for an outsource billing company. For postal discounts, you can distribute the statements in zip code order, or only for a certain range of account numbers. You may also distribute the statements as many times as you wish.
Field by Field Help - Distribute Statements screen
Identification Fields
Billing Group
Displays the billing group for which you are going to distribute statements.
Due Date
Displays the due date that was entered for these statements.
Post Date
Displays the post date (the first day of the period of service to be billed for) of this billing run.
Distribution Method
The fields in this section determine how the statements will be distributed.
Output Method to Use
Select the method in which to distribute the statements from your computer.
| Print the statements on your printer.
|
|
|
| File | Send the statement information to a file for distribution by a third party/other process.
|
|
|
| Send the statements via e-mail.
|
|
|
| EFT | Process EFT payments for each statement.
|
Statement Format Type
Choose the print format type to be used when printing statements. This field will be activated only when the print method is chosen for distribution.
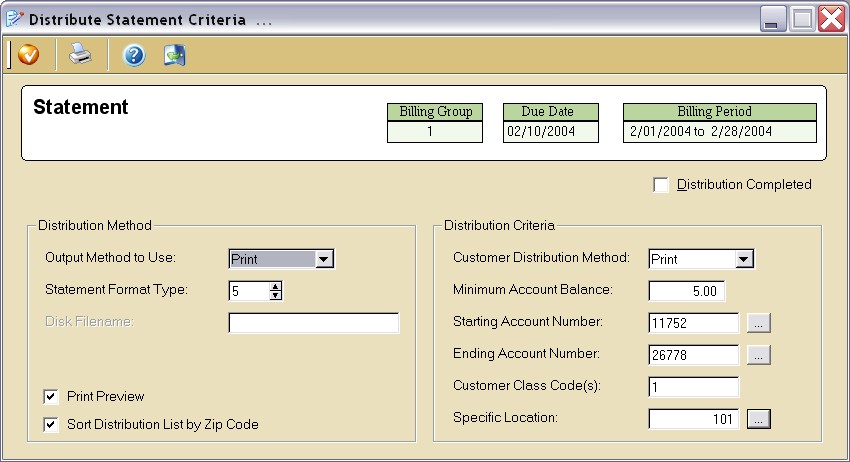
Figure 7-4. Distribute Statement Criteria screen
Disk Filename
Enter the full path name (i.e. C:\Intellisoft\MMWIN\BILLING.TXT) of the output file. This field we be activated only when the File or EFT methods are chosen for distribution.
Print Preview
When checked, will show a preview of the printout of your statements. This field will be activated only when the print method is chosen for distribution.
Sort Distribution list by Zip Code
When checked, will print out the statements in zip code order instead of account number order. This field will be activated only when the print method is chosen for distribution.
Distribution Criteria
The fields in this section determine which customers will be selected for distribution.
Distribution Completed
Check this box to denote that this distribution has been processed. The box will be checked automatically by ManageMore when the distribution is processed for the first time and the user accepts the processing as complete.
Customer Distribution Method
Select the distribution method of the customers that should be selected.
| All | Select all customers, except those marked "Do Not Print"
|
|
|
| Select only customers marked "Print"
|
|
|
| File | Select only customers marked "File"
|
|
|
| Select only customers marked "E-Mail"
|
|
|
| EFT | Select only customers marked "EFT"
|
|
|
| Do Not Print | Select only customers marked "Do Not Print"
|
Minimum Account Balance
Enter the least amount a customer's balance must be in order to receive a statement.
Starting Account Number
When distributing a range of account numbers, enter or select the account number at the beginning of the range here.
Ending Account Number
When distributing a range of account numbers, enter or select the account number at the end of the range here.
Customer Class Code(s)
When distributing selected class codes only, enter the class code(s) here. Multiple class codes can be entered individually, separated by commas; or in ranges, separated by hyphens.
| Suppose you wish to distribute statements for class codes 1, 4, 5, 6, and 7. You could simply type the following into the Customer Class Codes field: 1,4-7
|
|
|
|
|
|
|
When distributing for one location only, select or enter that location number here.
Buttons
Accept Window
Click this button to accept the criteria and begin distributing statements.
Close This Window
Click this button to discard the criteria and return to the previous window.
Print Summary
Click this button to print out a summary sheet of the customers to have statements distributed to them according to the statement criteria chosen above.
Q & A - Statements
Q01. I started to generate statements, but my computer crashed in the middle of doing so. Can I pick up where I left off?
A01. No. If any interruptions occur in the statement generation process, you should empty the list and restart the process. If an interruption occurs during the posting process, simply restart the posting process.
Q02. I was distributing my statements using credit card EFT, but several people came back with denials. Can I rerun this later, or do I have to accept the denials and deal with those invoices in another manner?
A02. You can rerun the EFT on the same distribution. The program will only retry an authorization on those customers it did not get an authorization for on previous tries.
Q03. I was printing statements and the printer stopped working. How can I print only those statements I have not printed yet?
A03. Go back and distribute again, and when prompted for the starting account number, enter the last account number that you left off with in the previous printing.
Q04. How do I change the way my bills look?
A04. To change your bill printing format, click on Setup ... Forms ... Statements. Then click on the Workstation Setup tab. You can choose your statement format type here.
Q05. How do I change the return address on my statements?
A05. To change the return address on your statements, click on File ... Company Info. Then change the Payment Address in the box provided. This will change the address on the statements the next time the statements are generated.
Q06. I added a few customers and want to get a bill sent out to them. Can I run a billing and have bills print just for them?
A06. If you run a billing, that billing affects everyone with that billing group. If you really want to get a statement out to a few customers, consider setting up a separate billing group for them, then generating statements for that billing group. Remember to change their billing group back to the one you originally set up for them.
Q07. I don't see my question here. Where else can I get information?
A07. Visit our website's Technical Support section.